Followers

How to Enable VMware VAAI and Install NetApp Plugin on ESXi

VAAI stands for VMware APIs Array Integration (for vSphere Storage).
VAAI is also referred to as hardware acceleration (or hardware offload APIs), which are a set of APIs to enable communication between VMware vSphere ESXi hosts and storage devices.
This APIs are enabled on the ESXi host to offload certain storage operations to the storage array instead of all the I/O operations being handled by the VM kernel.

The tasks that can be offloaded by these APIs are: VM cloning, migrating from one datastore to another, migrating datastore with in the same storage array, etc.
Hardware-assisted locking allows vCenter to offload SCSI commands from the ESX server to the storage system so the array can control the locking mechanism while the system does data updates.
VMware does not support VAAI on VMFS with multiple LUNs/extents if they all are on different arrays even if all arrays support offloading. In this case the vmkernel will handle I/O operations instead of the array.
This tutorial provides instructions on how to enable VAAI and install plugin on your VMware ESXi 5.x servers.

1. Enable VAAI from Command Line

You can verify whether VAAI is enabled ornot from command line using esxcfg-advcfg command.
 If the following output displays “0″ (as shown below), then VAAI is not enabled.
# esxcfg-advcfg -g /DataMover/HardwareAcceleratedMove
Value of HardwareAcceleratedMove is 0

# esxcfg-advcfg -g /DataMover/HardwareAcceleratedInit
Value of HardwareAcceleratedInit is 0
Use the option “-s 1″ to enable VAAI as shown below. You have to set both “Move” and “Init” to 1 as shown below.
#  esxcfg-advcfg -s 1 /DataMover/HardwareAcceleratedMove
Value of HardwareAcceleratedMove is 1

# esxcfg-advcfg -s 1 /DataMover/HardwareAcceleratedInit
Value of HardwareAcceleratedInit is 1
Please note that in VMware vSphere v5.0 and later, this is enabled by default.

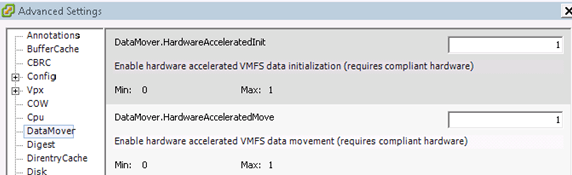
2. Enable VAAI from vSphere Client GUI

  • Open the VMware vSphere Client.
  • In the Inventory pane, select the ESXi/ESX host.
  • Click the Configuration tab.
  • Under Software, click Advanced Settings.
  • Click DataMover.
  • Change the DataMover.HardwareAcceleratedMove setting to 1.
  • Change the DataMover.HardwareAcceleratedInit setting to 1.
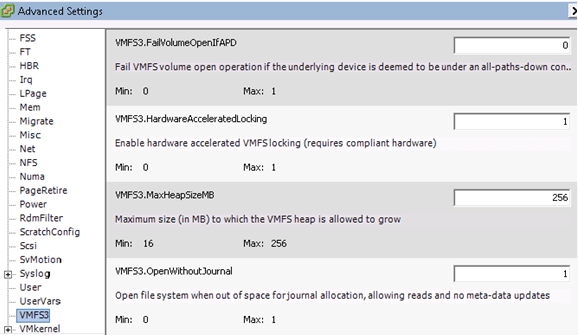
  • ESXi Datamover
  • Click VMFS3.
  • Change the VMFS3.HardwareAcceleratedLocking setting to 1.
  • ESXi VMFS3
  • Click OK to save your changes.
  • Repeat this process for the all ESXi/ESX hosts connected to the storage.

3. Verify the Plugin

You can use the esxcli command to verify whether the particular plugin that you are interested in installing is already present. In this example, I’m looking for NetApp plugin
esxcli software vib list | grep -i NetApp
For this example, I am installing the NetApp plug-in for NAS datastores. Download the latest plugin from the vendor website and save it locally. You can also download the plug-in for EMC storage and other vendors from their website.

4. Install the Plugin

Use the following esxcli command to Install the Plugin. As you notice the plugin will have .vib extension.
# esxcli software vib install -v /NetAppNasPlugin.v20.vib
Installation Result
   Message: The update completed successfully, but the system needs to be rebooted for the changes to be effective.
   Reboot Required: true
   VIBs Installed: NetApp_bootbank_NetAppNasPlugin_1.0-020
   VIBs Removed:
   VIBs Skipped:
After this, reboot the ESX machine for the changes to take effect.
Now, verify that the plugin is installed succesfully.
# esxcli software vib list | grep -i netapp
NetAppNasPlugin  1.0-020     NetApp     VMwareAccepted    2014-07-30

5. Check Datastore’s VAAI Support

Verify the NAS datastore already mounted supports VAAI using the vmkfstools command as shown below.
# vmkfstools -P -h /vmfs/volumes/46db973f-cca15877
NFS-1.00 file system spanning 1 partitions.
File system label (if any): TEMP NAS
Mode: public
Capacity 2 TB, 791.9 GB available, file block size 4 KB
UUID: 46db973f-cca15877-0000-000000000000
Partitions spanned (on "notDCS"):
 nfs:TEMP NAS
NAS VAAI Supported: YES
Is Native Snapshot Capable: YES

6. VAAI Performance Tuning and Monitoring

The default XCOPY (Clone operations) size is 4MB.
With a 32MB I/O, the expectation would be to see this counter in esxtop increment in batches of eight, the number of work items that will be created to deliver a 32MB I/O.
The default XCOPY size can be incremented to a maximum value of 16MB if required, but that should be done only on the advice of your storage array vendor.
While a storage array vendor might suggest making a change to this parameter for improved performance on their particular array, it may lead to issues on other arrays which do not work well with the new setting, including degraded performance.
You can observe the clone operations (XCOPY) in esxtop output. To see this output in esxtop, first select u for device view and then f to change which fields are displayed. Options o and p display VAAI statistics. Each primitive also has a column for failure statistics, that is, CLONE_F, ATSF and ZERO_F. These should be monitored for any failed operations.
Execute the following esxcfg-advcfg command to query the current transfer size:
# esxcfg-advcfg -g /DataMover/MaxHWTransferSize
Value of MaxHWTransferSize is 4096
Execute the following esxcfg-advcfg command to change the transfer size:
# esxcfg-advcfg -s 16384 /DataMover/MaxHWTransferSize
Value of MaxHWTransferSize is 16384

7. Check the status of VAAI

Use the following esxcli command to display the status of VAAI along with all installed plugins.
# esxcli storage core device vaai status get -d naa.xxxxxxxxxxxxxxxx
naa.xxxxxxxxxxxxxxxx
 VAAI Plugin Name: VMW_VAAIP_NETAPP
ATS Status: supported
Clone Status: supported
Zero Status: supported
Delete Status: supported
 
Published By
S.G.Godwin Dinesh.MCA
Sr.System Aministrator 
 

How to Install VMware Workstation on Linux and Create Virtual Machine

VMware Workstation is VMware’s commercial virtualization software for x64 computers.
This is a Type 2 hypervisor, which means it is installed on top of an existing operating system running on the computer hardware called the host operating system. It can be installed on both Linux and Windows host Operating Systems.
In VMware Workstation you can set up multiple virtual machines, each with its own guest operating system, and execute them simultaneously.

Supported guest operating systems can be 32 bit or 64 bit, including most Linux distros, most versions of Windows, and other OS like FreeBSD and Solaris.
This article will show how to install VMware Workstation 10 on two popular Linux distributions, CentOS 6.4 and Ubuntu 12.04 LTS, setup virtual machines for installing guest operating systems.

I. Install VMware Workstation

Download VMware Workstation

Download the 30 day trial version of VMware Workstation from here. The full version can be purchased from the VMware online store.
VMware Workstation comes with one install file for all Linux distributions, which is a zipped .bundle file. The latest stable release of VMware Workstation is 10.0.

Launch VMware Workstation Installer

To install VMware Workstation open a Terminal and cd to the directory containing the zipped VMware Workstation install file.
Unzip the install file from the downloads directory, and give execute permission for the user.
cd Downloads

unzip VMware-Workstation-Full-10.0.0-1295980.x86_64.zip

chmod 755 VMware-Workstation-Full-10.0.0-1295980.x86_64.bundle
On CentOS 6.4, execute the .bundle as shown below:
$ su -
Password: your password

# ./VMware-Workstation-Full-10.0.0-1295980.x86_64.bundle
On Ubuntu 12.04, execute the .bundle as shown below:
$ sudo ./VMware-Workstation-Full-10.0.0-1295980.x86_64.bundle
This will launch the installation process.

Accept the license terms

First, it will display the welcome screen with the end user license agreement. Accept the license and click on “Next”.
Next, it will display another license agreement for “VMware OVF Tool component for Linux”. Accept the license and click on “Next”.

Default Values

Next, it will ask the following questions. In most cases, just select the default values.
  • Check for product update on startup. Say “Yes”.
  • Send anonymous system data and usage statistics to VMware. Say “No”.
  • Enter the user that will initially connect to Workstation server. Type “root”.
  • Directory for shared viritual machines. Default at “/var/lib/vmware/Shared VMs”
  • HTTPS port. Default value 443.

License Key

Since this is a trial version of the software, you can skip this step. Just leave the license key field empty, and click on “Next”.

Finish the Install

Finally it will tell you the product is ready to be installed. Click Install to begin the installation.
After few mins, it will display the “installation was successful” message. Click on the “Close” button.

II. Create Virtual Machine from Workstation

Launch VMware Workstation

On CentOS you can launch VMware Workstation from Applications -> System Tools -> VMware Workstation.

On Ubuntu you can launch VMware Workstation from the Unity Dash as shown below.

On the VMware Workstation Home screen you can choose to Create a New Virtual Machine or Open an existing Virtual Machine.

Choose Configuration Type

To create a new virtual machine click Create a New Virtual Machine on the home screen or click “File” -> New Virtual Machine.
The New Virtual Machine Wizard will launch. You can choose a Typical configuration or a Custom configuration. The default is “Typical configuration”.

Install Guest OS

You can choose to install a guest operating system now from either a physical CD/DVD drive or an ISO image, or you may choose to install the guest operating system later.

Choose Guest OS

In this example we will install an Ubuntu 12.04 guest operating system on VMware Workstation.

Virtual Machine Name

Specify the virtual machine name, and location. The default values will be populated automatically based on selections from previous section.

Disk Size

In this screen you can specific the disk size for this VM. Also select “split virtual disk into multiple files” radio-button.

Create VM

Finally, it will display a summary screen with all your selections to create this particular VM. Review this and click on “Finish” to create this VM.
You’ll get a “Virtual Machine Created” confirmation screen. Click on “Close”.

New VM Tab

This newly created Ubuntu guest VM will get its own tab next to the Home tab as shown below.

Install Guest OS

To install the guest operating system click Edit virtual machine settings.
Here you can change various settings of the virtual machine the guest operating system will be installed on, such as Memory size etc.
Click on CD/DVD (SATA). Make sure Connect at power on is ticked and select Use ISO image. Browse to the location of the Ubuntu ISO file and click on Open.
Click Save to save the virtual machine configuration and close the Virtual Machine Settings window, On the Ubuntu virtual machine tab click on Start up this guest operating system, and install the guest operating system. After the installation is finished and the guest operating system is started.


Linux provides several powerful administrative tools and utilities which will help you to manage your systems effectively. If you don’t know what these tools are and how to use them, you could be spending lot of time trying to perform even the basic administrative tasks. The focus of this course is to help you understand system administration tools, which will help you to become an effective Linux system administrator.

Published By
S.G.Godwin Dinesh.MCA
Sr.System Administrator


How To Fix: External Disk Drive Suddenly Became RAW

A common and befuddling problem with computers is the sudden and seemingly inexplicable disappearance of an external hard drive that has been functioning properly. It can be a breathtaking experience to suddenly be told that your data, often irreplaceable pictures and documents, might be gone forever.
As with many similar situations in life the appropriate response is “Don’t panic”. When approached sensibly and carefully, the situation can be resolved and the data saved more times than not. Here we will look at the causes, fixes and preventative measures for instances involving external drives being used with Windows XP and Windows Vista/7.

Error Messages

Common error messages associated with the sudden inability to access an external hard disk drive.


Windows XP Windows 7
DO NOT FORMAT THE DRIVE


When attempting to access the drive in Windows you may see a message asking you to format the drive DO NOT FORMAT THE DRIVE
You need to format the disk in drive before you can use it.
Do you want to format it?

Another error that you may see when trying to access the drive in Windows from a program or the command line is…
This volume does not contain a recognized file system. Please make sure that all required file system drivers are loaded and that the volume is not corrupted.

Attempting to run chkdsk in an attempt to repair the problem will give an error also…
chkdsk can not be run on the drive
The type of the file system is RAW.
CHKDSK is not available for RAW drives.

The Disk Management window shows the partition as either RAW or without a filesystem type.


Properties of the drive show that both used and free spaces are 0 byte in size for the raw drive
Windows XP Windows 7


What does RAW partition mean

A RAW filesystem simply means that it is a filesystem that is not recognized by Windows. Therefore all the available filesystem drivers are unable to mount the filesystem as a drive. This often happens when the records determining the filesystem type or location on the disk are damaged or corrupted, usually the partition table or the boot sector.
Since Windows sees no filesystem in the partition, it prompts you to format it in order to create a filesystem on it. DO NOT FORMAT IT.


Why does it happen and how to avoid it

The most common cause of external hard drives suddenly becoming RAW drives is if they are disconnected from a computer without using the “Safely Remove Hardware” option. This can happen in many ways such as a power failure, unplugging the drive from the USB port or from its AC adapter, a problem with the computer that causes it to temporarily disconnect the USB hubs and many more circumstances can lead to this occurring.
Always use “Safely remove hardware” to disconnect the drive. Left click the icon on the taskbar, select the device from the menu, and wait for the confirmation message.

How do you fix it For this example, I chose the most heavily damaged disk with this issue that I could find in my collection of damaged disks. It has both of the most common problems. The partition table is corrupted and the boot sector of the main partition is also scrambled. The pictures of error messages above all came from this drive. The pictures of the repair process below are from the actual repair of this drive. Some images are from a virtual machine (simply to make it easier to get the screenshots) and some are from an actual desktop. This is a real repair not a manufactured example.

Before proceeding beyond this point, you need to be aware of the risks involved. If the problem with the drive is not simply a logical error but is a manifestation of physical damage then the more you use it and try to repair, the worse the damage may become. To minimize the risks, the drive can be taken to a professional who is experienced in this type of repair. The drive should not be making strange clicking or beeping noises. That means that there is definitely physical damage and it should be sent to a facility with the proper tools and environment to repair/recover it since trying to repair it as described in this post can make that situation worse. If you wish to continue on your own there are three important rules to remember.

1. Computer problems are variable. You may very well come up with a different situation than I outline below. Make sure that you stop and think things through carefully when the process becomes different than I describe.

2. You DO NOT WANT TO WRITE ANYTHING TO THE RAW DRIVE except for the repaired MBR and repaired Boot Sector if necessary. Any other writing can overwrite data on the drive that you would want to keep.

3. This repair does not apply to solid-state drives (SSD). They are very different than normal drives and can erase important data on a RAW partition just by connecting power to them.

Do you want to recover anything extra important first?

This step is optional and does not always work. EDIT 1/22/2013
It can put your mind at ease and make the process less stressful if you can successfully and quickly make copies of the most important files on the drive. After making sure that these files are safely copied to another drive, you can continue with repairing the drive with a much more relaxed demeanor and thus be less likely to make a mistake.
Often you can access the data on the missing drive by booting with a Linux LiveCD. The hard disk drive being used in this example is too damaged to do this but there is another article with instructions here that uses a drive that while not visible in Windows was accessible with a Linux LiveCD.

Repair partition table and boot sector


In order to repair the most common problems that cause an external disk to suddenly become RAW we will use a PartedMagic Linux boot CD and one of the tools included on it called TestDisk. Both of these items are free and I urge you to donate to them if you are helped by their use and have the ability to make a donation.
This method allows us to work on the drive without attempting to mount it and gives us more direct access to it than trying to fix it in Windows.
First make a bootable CD or USB stick of PartedMagic. Instructions can be found here.
Boot the computer that has the bad drive connected to it with the PartedMagic CD/USB that you made. A menu will pop up, please select
1. Default Settings (Runs from RAM)


When it finishes booting you will notice that it looks kind of like a Windows desktop. The button in the lower left works like the START button in Windows XP and allows you to select and run various programs or shutdown the computer. To make things easy, I’ll just refer to this as the START button.
Click on the Terminal button down near the START button (It has a picture of a monitor on it) and type
testdisk
and press enter.

TestDisk is a console application so you have to use your keyboard to interact with it instead of your mouse.
Choose No Log and hit enter
Make sure that your external disk is highlighted
Choose Proceed and hit enter
Select Intel and hit enter (there is a slight chance that the partition is EFI GPT if the drive is 2TB or greater in size and at the bottom of this screen it says that Hint: EFI GPT was detected. If that is the case, select EFI GPT instead and try that.)
Select Analyse and hit enter
The partition data looks incorrect (an explanation of why is beyond the scope of this article)
Select Quick Search and hit enter
Say ‘Y‘ if it asks if the disk was made in Vista/Win7 (even if it was made in XP say ‘yes’)
Now the Quick Search will run
When the Quick Search completes, we see one partition (if you only see the option to CONTINUE at the bottom of the screen press ENTER one time to continue to the screen that you need to be at).
Lets look at the data on that partition press
P
and you should see a list of files/folders in the partition.
Hmmm… This looks like a bunch of diagnostic tools but not our missing data. We’ll need to look further. Press
Q
to go back a screen and then press
enter
To get to this screen, select DEEPER SEARCH and press enter.
Naturally, the Deeper Search takes longer than the Quick Search
When the Deeper Search completes we now see two partitions. The one we saw after the quick search and another one.
Select the new partition and press
P
to see the files/folders and now we see the data we want to make visible again.
Press
Q
to go back a screen and then press enter to get to this screen.
Select WRITE and press enter in order to write our new partition table to the drive.
DO NOT WRITE A NEW PARTITION TABLE IF YOU DID NOT SEE YOUR FILES/FOLDERS That means the proper partition table was not found and you will have to try a different technique to recover your data.

Press Y to confirm that you want to write the new partition table.
As I mentioned at the start of this repair, this disk also has corruption in the boot sector of the partition that we are trying to make visible again. When this is the case TestDisk will stop at this point and ask you to fix it before it finishes writing the new partition table. If the backup boot sector is good (as in this case) simply choose BACKUP BS and press enter. In the event that the backup boot sector is also bad then choose REBUILD BS.
Press Y to confirm the boot sector repair
Then choose QUIT and press enter
Regardless of whether a boot sector repair is required or not, you will end up at this screen where all you can do is press enter. Then hit Q until you are out of TestDisk.
Now remove the PartedMagic CD and shutdown the computer START>SHUTDOWN and then try booting it into Windows to see if the drive is now visible.
Here are the results for the drive used in this example…


Backup important files and run chkdsk

Now you should make backups of all important files on the drive in case it goes bad again and then run chkdsk to fix any other filesystem errors that may still exist.
After backing up important files, right-click the disk in Windows Explorer and choose PROPERTIES. Go to the TOOLS tab and click CHECK NOW. Check both options and click START.
Published By
S.G.Godwin Dinesh.MCA
Sr.System Administrator

What is the krbtgt account used for in an Active Directory (AD) environment?

The Kerberos authentication protocol uses session tickets that are encrypted with a symmetric key derived from the password of the server or service to which a Windows user requests access. To request a session ticket, the user must present a special ticket, called the ticket-granting ticket (TGT) to the Kerberos Key Distribution Center (KDC) service on a domain controller (DC). All Windows users get a TGT from the KDC at the start of their Windows login session after they successfully authenticate to the KDC by using their password.
The KDC encrypts a user's TGT with a key it derives from the password of the krbtgt AD domain account. The krbtgt account and its password are shared between the KDC services of all DCs in a domain. The krbtgt account is automatically created as part of the dcpromo AD installation process on the first DC in a domain. It shows up in the Users container of the Microsoft Management Console (MMC) Active Directory Users and Computers snap-in and is disabled by default. Unlike other AD user accounts, the krbtgt account can't be used to log on interactively to the domain. Because it's a built-in account, krbtgt also can't be renamed.
A read-only domain controller (RODC) is a new type of DC that Microsoft introduced in Windows Server 2008. An RODC hosts read-only partitions of the AD database. It doesn't store the password hashes of all user accounts in a Windows domain; instead, an RODC stores only the password hashes of the accounts that are defined in the RODC's Password Replication Policy (PRP). This method means that the compromise of an RODC represents much less risk than the compromise of a classic read/write DC (RWDC) that holds copies of the password hashes of all user accounts in a domain. That's why an RODC can be deployed in a way that might be considered less secure. Organizations typically deploy them in branch offices or in their demilitarized zones (DMZs).
An RODC acts as a Kerberos KDC for a branch office or DMZ, and as such it also requires a krbtgt account. To ensure that the krbtgt of a compromised RODC can't be leveraged to request tickets to other RODCs or RWDCs, each RODC has a special local krbtgt account. This account has the format krbtgt123, where "123" is a string of random numbers. This random string uniquely identifies the RODC and is generated when an RODC is installed.
The different local krbtgt accounts of the RODCs in a domain are stored in AD and show up in Active Directory Users and Computers under the Users container. All RWDCs in the domain also keep a copy of the password hashes of the krbtgt accounts of the RODCs in the domain. Therefore, a TGT that's issued by an RODC is valid for requesting session tickets against the same RODC and also against any other RWDC in the domain.
If an RODC receives a session ticket request that's based on a TGT that isn't valid -- meaning that the TGT wasn't issued by the RODC itself -- it returns a Kerberos error asking the client computer to request a new TGT request against the RODC itself. If the RODC doesn't have a copy of the user's password hash, the RODC forwards the TGT request to a RWDC. In this case, the RODC acts as a proxy, whereby it forwards the answer from the RWDC directly to the client computer. At the same time, the RODC triggers the process of caching the user password hash so that the RODC will be able to create a TGT for that particular user in the future. The caching succeeds if the RODC's PRP allows the user account's password hash to be cached on the RODC.

Published By
S.G.Godwin Dinesh.MCA
Sr.System Administrator

How to Update VMware ESXi 4.1 to 5.0 – Easy Steps

This guide explains simple steps to update VMware ESXi 4.1 to 5.0 version. The update can be done in several ways depending on the running environment of Server virtualization software VMware ESXi. The easy and recommended way is, in-place update buy booting the hypervisor server with ESXi 5 installation ISO or DVD.
I  have a running ESXi 4.1 on VMware workstation for testing purpose which is on Windows 7 host. Check the earlier guide how to install ESXi on VMware workstation on desktop computer.
VMware recommends to do the update in following ways, find the complete guide from official site here.
  • vSphere Update Manager
  • Upgrade or migrate interactively using an ESXi installer ISO image on CD/DVD or USB flash drive
  • Scripted upgrade
  • vSphere Auto Deploy
  • esxcli
Update process requires to reboot ESXi server, so obviously all working virtual machines should be powered off or paused properly. Also it can take around 30 to 40 minutes depending on the datastore size as per VMware’s document.

Update VMware ESXi 4.1 to 5- Easy Steps

1) Here is the running version on VMware workstation. I will show how to update the current 4.1 to 5.0.
running 4.1
2) Connect to Hypervisor server by vSphere client and shutdown or pause the working virtual machines.
shutdown vm
3) Shutdown the ESXi 4.1 host and mount ESXi (vSphere) 5 installation medium. You can download 5.0 ISO from official site here. Burn it on CD (if it’s a physical host) or use the same ISO (If it is running on virtualized environment, like mine)
mounted ISO
4) Now start the host from CD/DVD. Select first option as installing on new host.
select first option
5) Wait for all scripts to be loaded and press Enter to continue at welcome screen. Press F11 to accept license term.
It will list out the detected disk partitions in next screen. Select the partition which is having VMware ESXi 4.1 installation. That will be shown with * mark.
select disk and update
6) Next screen will inform about existing ESXi and VMFS datastore. Select first option for force migrating to ESXi 5.0
Force migrate
7) You may get few warning message now. You can ignore and continue the installation by pressing Enter or F11.
Last warning will be about roll back issue after 5.0 update. Anyhow, since I’m doing this on virtual environment with VMware workstation, I already took a snapshot.
force migrate warning message
8.) The running update process of ESXi 4.1 to ESXi 5.0
upgrading message
Reboot the server once update is completed. Remember to remove installation CD or ISO before reboot.
reboot
9) That’s it, update is done. Reboot will take some time. You should get the same virtual machines (with exact stats like powered off or paused) and settings with the latest ESXi 5.0 version.
updated version
Though this guide is late in getting published, but I’m sure this will be useful with screenshots.
 
Published By
S.G.Godwin Dinesh.MCA
Sr.System Administrator