Followers

What type of Operating System do we have? Its 32bit or a 64bit

What operating system do I have? I stumbled across this dilemma when I needed to download a free file from the Microsoft website and was presented with two choices for my download. I could download the file in 32 bit version or 64 bit version, depending on which one suited my operating system.
But the question remained, what operating system do I have? You really need to know if you have Windows XP home, Windows XP Professional, Windows Vista Home, Premium, Ultimate, or Business? The list goes on. Maybe you have Windows Seven. Also the average user has no idea what the difference is between a 32 bit operating system and a 64 bit so I will show you how to find out which one is running on your computer.

Lets start with some computer basics:

What is a processor?

The processor is a main component of a computer that is attached to the mother board. It is technically called the Central processing Unit or CPU for short. It is the brain of the computer because it processes all of the information and data. The bigger your processor, the faster your computer performs your tasks. If you have a 64 bit processor it would probably be reasonably fast as this is a new technology. We have also mentioned components of a computer in a basic computer terminology article.

What is an Operating system?

An operating system is the software you install on your computer that allows you to operate the computer. Windows is an operating system. If you want to find out what operating system you have then this is very simple. You need to know what operating system you have on your computer so you can download the right drivers and software that is compatible.

What Operating system do I have?

If you are wondering if you have Windows XP, Windows Vista, or Windows Seven, it’s very easy to find out. If you are wondering if your computer is a 32bit or 64bit then read on further down the page. People often ask me “what operating system do I have?” I would have thought this was a well known computer basics thing to know, however many do not know the answer. The average computer user does not work with all versions of Windows as much as I do so how can I expect them to know?
1.  Go to your start menu. This will apply for all Windows Versions.
2.  Click on control panel in the menu.
3.  Double click on the system icon. If you cannot see all the pretty icons press on the link to view the control panel in classic view.
4.  You will see all the details in front of you. See the screen shot below. Click on the picture to see a larger size. Here you can see what operating system you have.

The above screen shot shows Windows vista and the below shot is Windows XP. It looks different but the information result is the same. They both tell you what operating you have.

The information I can see here is:
  • What operating system I have and what version and service pack.
  • How much computer memory I have.
  • What processor I have.
  • What speed the processor is.
  • If I have a 32bit or 64bit processor. (Sometimes it is not shown on an old computer)

What Operating system do I have and is it 32bit or 64 bit?

A 64 bit operating system is an operating system such as Windows XP or Windows Vista, that has been purposely developed for a computer with a 64 bit processor. You cannot use 64 bit software on a computer with a 32 bit processor but you can use 32 bit software with a 64 bit processor.

What operating system do I have and is 32 bit or 64 bit?

Windows XP
  1. Go to the start menu.
  2. Choose all programs.Windows 7 Professional SP1 64bit (Full) System Builder DVD 1 Pack
  3. Then choose accessories, then system tools.
  4. Now choose system information.
  5. See the screen shot below.

If it says x86 then you have a 32 bit operating system. If the processor area mentioned a 64 or AMD64 then this means you have a 64 bit processor.  If it said Microsoft Windows XP Professional x64 Edition Version then this means it is a 64 bit operating system. However as you can see from above, it says Microsoft Windows XP Professional and the processor starts with X86 so therefore this is a 32 bit processor with a 32 bit operating system.

The screen shot above shows a 64 bit operating system which means I also have a 64 bit processor to allow this.

Windows Vista

In Windows Vista you can find out the same way. Start menu>Programs>Accessories>System tools>System information. You can also type the word system into the search bar in the start menu.

Bargain: If you find that you do have a 64 bit processor check out this Windows Seven operating system for under $100!
Windows 7 Home Premium 64 Bit

What operating system do I have? Another way to see if you have a 32 bit or a 64 bit operating system

1.  Go to control panel by going to the start menu in the bottom left corner.
2.  Click on the system icon.
3.  The information will be there.
4.  See in the screen shot below I have a 32-bit Operating system.

On my laptop I have a 64 bit Operating system installed because the laptop has a 64-bit processor.

What are the advantages and disadvantages of having a 64 bit system?

  • You will need to install 64-bit drivers for all your add ons like your printer, usb stick, digital camera, and more. This is why people have had problems with having a 64 bit system. However as time goes on the technology gets better and more refined… Soon drivers will be available for most devices.
  • If you have a 64 bit processor and a 64 bit operating system you will have to have  64-bit software applications like office programs, picture editors, and so on..
  • There is not much compatible software available at the moment, however this is changing.
  • A Vista 64 bit operating system does not support any 32 bit software.
  • An AMD 64 bit processor supports both 32 bit and 64 bit operating systems.
  • Vista 64 bit operating system has major improvements on security features and kicks the 32 bit butt. New features that prevent and almost make system attacks impossible.
  • Vista Home Basic 64 bit supports up to 8 GB of RAM, Vista Home Premium 64 bit supports up to 16 GB and Vista Business, Enterprise, and Ultimate 64 bit supports up to 128 GB, whereas 32 bit Vista supports 4 GB or RAM.
  • A 64-bit processor is made with more advanced processes, have more features, and of course has faster speeds.

Notes: 32 bit and 64 bit operating system

  • You can upgrade from XP 64-bit to Vista 64-bit, but not from Vista 32-bit to Vista 64-bit.
  • If you are running a 64 bit operating system then we must presume you have a 64 bit processor as well.
  • You can also type winmsd.exe into the run box for the system information box to come up.
  • You can also press The WIN KEY and pause break to open system properties. Sometimes the information is there.
  • Now that you know if you have a 32bit or 64 bit system, find out more information about your computer.
Published By
S.G.Godwin Dinesh.MCA
Sr.System Administrator

Solving Error 0x00000709: “Can’t Set Default Printer” Problem


I recently had a troubleshooting appointment for an HP all-in-one printer that could not be set as the default printer. When I tried to make it the default, a message box came up saying "operation could not be completed error (0x00000709)”. Other than that, it seemed to work fine. I even removed all the printer software through “Programs And Features” in the Windows control panel followed up by a Windows system registry scan. I then performed a clean install of the HP printer software – still no joy.

Next, I began to research the "operation could not be completed error (0x00000709)” error message on the internet. I came across a variety of solutions, which I tried in succession with no luck. I finally discovered the one that worked. It was a simple fix to the Windows system registry. This is what I did to solve the annoying little problem:

I.      Type “regedit” followed by the enter key in the “search program and files” text box in the pop up menu that appears after clicking the Windows “start button” in the lower left hand corner of the Windows desktop screen.

II.      Next, click “HKEY_CURRENT_USER” in the left hand pane of the Windows registry editor.

III.      Then click “Software” followed by “Microsoft” and next “Windows NT”.

IV.      While under the “Windows NT” entry, click “CurrentVersion” and then “Windows”.

V.      Now, one of the entries you should see in the right hand pane is “Device”. If the value for “Device” as noted under the “Data” area is anything other than the printer you are using, then highlight “Device” in the right hand pane with the mouse and press the delete key to remove it.

VI.      Restart the computer so it starts with the altered Windows system registry.After the Windows desktop appears again, you should be able to go into the “Printers” area and designate your printer as the default without receiving the "operation could not be completed error (0x00000709)” message.
Being able to designate the default printer can save you a fair amount of work over the long run. This is because you won’t have to specify your destination printer in the printer dialog box – it is already selected since it’s been set as the default.

Quickly solve:

a) Click on Start.
b) Type regedit in the start search and click Enter.
c) Move to the location mentioned below.

              HKEY_CURRENT_USER\Software\Microsoft\Windows NT\CurrentVersion\Windows

d) In the right column, you will find key Device, change the value to your Printer name.
e) It is of the format for example: "HP LaserJet 4250 PCL6,winspool,Ne03:".
f)  Right click on the value and click on Rename, change it to your printer name.

Published By
S.G.Godwin Dinesh.MCA
Sr.System Administrator

Unable to set DEFAULT PRINTER

 Unable to set DEFAULT PRINTER? - Let's troubleshoot

Note:

1.You have handled in registry,so please take up registry backup.
2.Create restore point( before registry backup)

Unable to Set Default Printer pop-up error window:


This error is related to the old printer you have set as default before. Printers name that was recorded in your registry are priority on the system which you cannot modify if you're trying to set a new default printer. So you have to manually modify the registry. Note that the registry section is very sensitive,  serious  problems might occur if you modify the registry incorrectly.  Therefore, make sure that you follow these steps carefully.  For insurance included, move down the registry before you alter it. And that point, you can restore the registry if an issue happens. For Additional data about how to go down and restore the registry, click the accompanying article number to view the article in the Microsoft Knowledge Base:
How to back up and restore the registry in Windows: (http://support.microsoft.com/kb/322756/)

Now, here's how to troubleshoot:

1. Click the Start button and type "regedit", then right click and "run as administrator"


2. Now go to this location:

HKEY_CURRENT_USER\Software\Microsoft\Windows NT\CurrentVersion\Window


3. Located in the right column, you can change the device key v alue data to your printer name. Right click on the Device key then modify the data value (e.g. "HP Laserjet P1006,winspool,Ne03:")


Note: You MIGHT encounter this "Error Editing Value" which you are unable to modify the data,


All you have to do is to set "permissions" to the key, and this is how its done:

Right Click on the "Windows" key and choose "Permissions", check "Allow" -> Apply, then OK.

Creating Addtional Users Admin Accounts in Active Directory


UAC helps standard users and administrators protect their computers by preventing programs that may be malicious from running. The improved user experience makes it easier for users to perform daily tasks while protecting their computers.


UAC helps enterprise administrators protect their network by preventing users from running malicious software.

The built-in Administrator account in Windows Server 2008 R2, which is the first account created on a server, does not run in Admin Approval Mode. All subsequently created administrator accounts in Windows
Server 2008 R2 do run in Admin Approval Mode.


Published By

S.G.Godwin Dinesh.MCA

Sr.System Administrator

Setup a Local FTP Server in Windows 7

In windows 7 you can share files on home network easily using home group But creating an FTP (file transfer protocol) gives you many benefits like easy to sending and receiving your secure data, security feature,give the unlimited space . File transfer protocol is a part of IIS (internet information services) feature that can be installed after the normal windows 7 installation is complete .Step by step make an FTP server in windows 7 ultimate.
#Open control panel and click on Programs and Features.
ftp server on windows 7
# In programs click on Turn Windows features on or off.
ftp server on windows 7
# After clicking you will see a new windows. Find the internet information services And check on FTP SERVER then click ok button.
ftp server on windows 7
#open control panel click on Administrative tools.
ftp server on windows 7
#Open the IIS Manager, right click on sites and click FTP site and  Click on ADD FTP Site.
ftp server on windows 7
#Write a name for your FTP site and select the path of share folder.

ftp server on windows 7

#Select the default IP address and NO SSL for SSL options.
# clicks on Next tab.
ftp server on windows 7
# Authentication setting. Select Anonymous and Basic.
#For the Authorization setting chose the specific user.
ftp server on windows 7
#enters the user name and permission for user read and writes and click finish tab.
ftp server on windows 7
You can now access this local FTP Server form any other system of your Local network. type the URL for FTP is ftp://192.168.65.1 Enter  user name or password.

ftp server on windows 7

Create a Bootable USB for Linux.

If your DVD driver is not working then it is not possible to install a fresh copy of your windows or Linux operating system. But using bootable pen drive or USB drive you can do this task. This tutorial will show you that How to create a bootable USB (universal serial bus controller ) for Stick on Linux. Universal USB installer is a live Linux disk that allows you to choose from a selection of Linux distributions to put on Your USB drive.


 Download exe of universal-USB-installer for following suit.


Step by step make a Bootable Ubuntu Linux.
#Double click on universal  USB  installer exe file.
#License agreement windows are shown  click on accept  tab.

USB Bootable in Ubuntu

#Setup  your selection page are open.

USB Bootable in Ubuntu


#Select a Linux Distribution form the  drop down to put on your USB.
#Select Ubuntu 12.10 OS.

USB Bootable in Ubuntu

#Browse the ISO image path and click OK.

USB Bootable in Ubuntu

#Select your USB drive letter.

USB Bootable in Ubuntu

#click on create tab.

USB Bootable in Ubuntu

#USB makes bootable process started.

USB Bootable in Ubuntu

#Installation done,  the process  is complete click on close tab.
#Then install Ubuntu Linux from pen drive.


USB Bootable in Ubuntu

Failover and Load Balancing in Dell SonicWALL


Feature/Application:
Primary WAN Ethernet Interface


Alternate WAN #1
Alternate WAN #2
Alternate WAN #3
LB Members added to a LB Group take on certain “roles.” A member can only work in one of the following roles:
Primary—Onlyone member can be the Primary per Group. This member always appears first or at the top of the Member List. Note that although a group can be configured with an empty member list, it is impossible to have
members without a Primary.
Alternate—More than one member can be an Alternate, however, it is not possible to have a Group of only Alternate members.
Last-Resort—Only one member can be designed as Last-Resort. Last-Resort can only be configured with other group members.
Each member in a group has a rank. Members are displayed in descending order of rank. The rank is determined by the order of interfaces as they appear in the Member List for the group.

The order is important in determining the usage preferences of the Interfaces, as well as the  level of precedence within the group. Thus, no two interfaces within a group will have the same  or equal rank; each Interface will have a distinct rank.
Procedure:
1. On the Network > Failover & LB page, under settings check the options Enable Load Balancing and
    Respond to Probes . Under the Groups, Click Configure for Default LB Group .
Enable Load Balancing : If enabled, allows the user to access the LB Groups and LB Statistics section of the FLB configuration. If disabled, the LB Groups and LB  Statistics are greyed-out and LB function is not performed.

Respond to Probes: This is independent of the “Enable Load Balancing” checkbox. Even if “Enable Load Balancing” is disabled, “Respond to Probes” can be enabled and can function properly. When “Respond to Probes” is enabled on the device, the device can reply to probe request packets that arrive on any of its interfaces.
Any TCP-SYN to Port:-This Configuration takes a TCP port parameter to further specify what kind of probe request packets will be processed. When enabled, the device only responds to TCP probe request packets having the same packet destination address TCP port number as the configured value e.g. 12345.

Please Note:
The  Add LB Group button is grayed out, currently we only support the Default LB Group and future releases will Support Multiple.
2 .Edit LB Group Windows is displayed, Under the general tab select the type of load balancing method
Group members: From the list of available WAN interface select the interfaces that has to participate in the failover function.
Interface Ordering:
The first interface added is the Primary. Succeeding additions will add the interface to the tail of the member list giving them lower rank.

Type (or method) of LB

—Choose the type of LB from the dropdown list (Basic Active/Passive Failover,Round Robin, Spillover-Based, or Percentage-Based). 
Basic Active/Passive Failover:
The WAN interfaces use ‘rank’ to determine the order of preemption when the  Preempt and failback to preferred interfaces when possible checkbox has been enabled. Only a higher-ranked interface can preempt an Active WAN interface .
Final Back-Up:- The Final Back-Up interface is used IF and ONLY IF there are no other interfaces Available in the group. It is for FAILOVER only and always gets preempted by other members. Only one interface can be selected as a last-resort interface, but it is not required for any LB Group to have a Final Back-Up. The rule of preemption (enable/disable) does not apply to a Final Back-Up interface; preemption enable/disable only applies to Primary and Alternates. A Final Back-Up interface is never used for LB, so it does not take a percentage in Ratio, never gets elected in RR,and never gets Spillover traffic.
Round Robin:
This option now allows the user to re-order the WAN interfaces for Round Robin election. The order is as follows: Primary WAN, Alternate WAN #1, Alternate WAN #2, and Alternate WAN #3; the Round Robin will then repeat
back to the Primary WAN and continue the order.


Spillover:
Thebandwidth threshold applies to the Primary WAN. Once the threshold is exceeded, new traffic flows are allocated to the Alternates in a Round Robin manner. Once the Primary WAN bandwidth goes below the configured
Shreshold, Round Robin stops, and outbound new flows will again be sent out only through the Primary WAN.
Note that existing flows will remain associated with the Alternates (since they are already cached) until they timeout normally.
Ratio:
There are now four fields so that percentages can be set for each WAN in the LB group. To avoid problems associated with configuration errors, please ensure that the percentage correctly corresponds to the WAN interface it indicates.To set the individual percentages of the member interfaces, an input box beside the member list is provided for the percentage value. The total  of the percentage settings should be 100.
Use Source and Destination IP Address Binding:
When you are using percentage-based load balancing, this checkbox enables you to maintain a consistent mapping of traffic flows with a single outbound WAN interface, regardless of the percentage of traffic
through that interface. 
Note: When one of the WAN interface goes down the new connections will flow through the available WAN interfaces.


Step 2: Configure Probing

1. Once the Load Balancing method is selected, go to the Probing tab On the probing tab the following options are available.
Check Interface—The interval of health checks in units of seconds
Deactivate Interface—After a series of failed health checks, the interface sets to “Failover”
Reactivate Interface—After a series of successful health checks, the interface sets to “Available”

Note: Probe responder.global.sonicwall.com on all interfaces in this group- when enabled, it causes the Per-member Probe Settings to be greyed-out and automatically set to this fixed setting:
Logical/Probe Monitoring" enabled
             Probe succeeds when Main Target responds” is selected
Main Target is set to TCP, host responder.global.sonicwall.com, TCP port 50000
           Alternate Target is greyed-out
     Default Target IP is set to 204.212.170.23

 Probe responder.global.sonicwall.com once this checkbox is selected, the rest of the probe configuration will automatically enable built-in settings. The same probe will be applied to all four WAN Ethernet interfaces. Note that the Dialup WAN probe setting also defaults to the built-in settings 
2. Navigate to the Network >Failover & LB screen, and expand the Default LB Group ;Notice that the member interfaces have grayed-out Configure buttons
3.Edit the Default LB Groupand go to the Probing tab;

Disable the option “Probe responder.global.sonicwall.com on all interfaces in this group ” ;
hit then OK.
 4.Return to the Network > Failover & LB screen, and expand the Default LB Group ; Notice that the member interfaces now have usable Configure buttons.
5.Configuration the settings depending upon the requirement.
Published By
Godwin Dinesh.MCA
Sr.system Administrator


View this video in youtube and how to to in Sonic Firewall

Blue Scrren Error & how to view MiniDump files in windows 7

how to view minidump files in windows 7

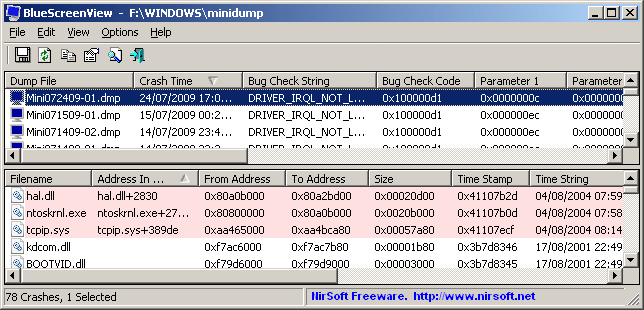
BlueScreenView scans all your minidump files created during 'blue screen of death' crashes, and displays the information about all crashes in one table. For each crash, BlueScreenView displays the minidump filename, the date/time of the crash, the basic crash information displayed in the blue screen (Bug Check Code and 4 parameters), and the details of the driver or module that possibly caused the crash (filename, product name, file description, and file version).

For each crash displayed in the upper pane, you can view the details of the device drivers loaded during the crash in the lower pane. BlueScreenView also mark the drivers that their addresses found in the crash stack, so you can easily locate the suspected drivers that possibly caused the crash.
Download links are on the bottom of this page


Crashes Information Columns (Upper Pane)

  • Dump File: The MiniDump filename that stores the crash data.
  • Crash Time: The created time of the MiniDump filename, which also matches to the date/time that the crash occurred.
  • Bug Check String: The crash error string. This error string is determined according to the Bug Check Code, and it's also displayed in the blue screen window of Windows.
  • Bug Check Code: The bug check code, as displayed in the blue screen window.
  • Parameter 1/2/3/4: The 4 crash parameters that are also displayed in the blue screen of death.
  • Caused By Driver: The driver that probably caused this crash. BlueScreenView tries to locate the right driver or module that caused the blue screen by looking inside the crash stack. However, be aware that the driver detection mechanism is not 100% accurate, and you should also look in the lower pane, that display all drivers/modules found in the stack. These drivers/modules are marked in pink color.
  • Caused By Address: Similar to 'Caused By Driver' column, but also display the relative address of the crash.
  • File Description: The file description of the driver that probably caused this crash. This information is loaded from the version resource of the driver.
  • Product Name: The product name of the driver that probably caused this crash. This information is loaded from the version resource of the driver.
  • Company: The company name of the driver that probably caused this crash. This information is loaded from the version resource of the driver.
  • File Version: The file version of the driver that probably caused this crash. This information is loaded from the version resource of the driver.
  • Crash Address:The memory address that the crash occurred. (The address in the EIP/RIP processor register) In some crashes, this value might be identical to 'Caused By Address' value, while in others, the crash address is different from the driver that caused the crash.
  • Stack Address 1 - 3: The last 3 addresses found in the call stack. Be aware that in some crashes, these values will be empty. Also, the stack addresses list is currently not supported for 64-bit crashes.

Drivers Information Columns (Lower Pane)

  • Filename: The driver/module filename
  • Address In Stack: The memory address of this driver that was found in the stack.
  • From Address: First memory address of this driver.
  • To Address: Last memory address of this driver.
  • Size: Driver size in memory.
  • Time Stamp: Time stamp of this driver.
  • Time String: Time stamp of this driver, displayed in date/time format.
  • Product Name: Product name of this driver, loaded from the version resource of the driver.
  • File Description: File description of this driver, loaded from the version resource of the driver.
  • File Version: File version of this driver, loaded from the version resource of the driver.
  • Company: Company name of this driver, loaded from the version resource of the driver.
  • Full Path: Full path of the driver filename.

Lower Pane Modes

Currently, the lower pane has 4 different display modes. You can change the display mode of the lower pane from Options->Lower Pane Mode menu.
  1. All Drivers: Displays all the drivers that were loaded during the crash that you selected in the upper pane. The drivers/module that their memory addresses found in the stack, are marked in pink color.
  2. Only Drivers Found In Stack: Displays only the modules/drivers that their memory addresses found in the stack of the crash. There is very high chance that one of the drivers in this list is the one that caused the crash.
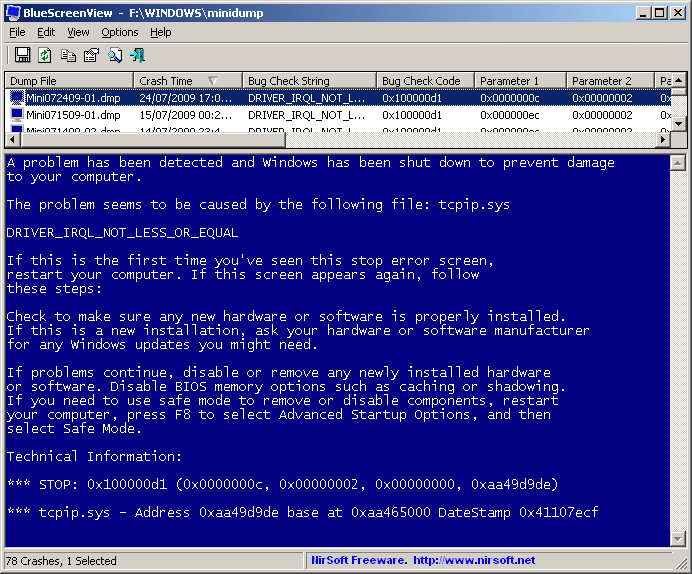
  3. Blue Screen in XP Style: Displays a blue screen that looks very similar to the one that Windows displayed during the crash.
  4. DumpChk Output: Displays the output of Microsoft DumpChk utility. This mode only works when Microsoft DumpChk is installed on your computer and BlueScreenView is configured to run it from the right folder (In the Advanced Options window).
    You can get DumpChk from the installation CD/DVD of Windows or with the installtion of Debugging Tools for Windows.

Crashes of Remote Network Computer

If you have multiple computers on your network and you have full administrator access to them (e.g: you have access to \\ComputerName\c$), you can also view the crashes of the other computers on your network remotely. In order to do that, simply go to 'Advanced Options' (Ctrl+O) and type the MiniDump folder of the remote computer, for example: \\MyComp\c$\Windows\MiniDump. Notice: If you fail to get full administrator access to the remote computer, you should read the instructions in the following Blog post: How to connect a remote Windows 7/Vista/XP computer with NirSoft utilities.
Watching the crashes of multiple computers on your network

If you have a network with multiple computers, and you have full admin access to these computers, you can view the blue screens list of all these computers in one table, and easily detect computers with recurring BSOD problems. In order to use this feature, prepare a list of all computer names/IP addresses that you want to inspect, and save it to a simple text file. The computer names in the list can be delimited by comma, semicolon, tab character, or Enter (CRLF).
Example for computer names list:
comp01
comp02
192.168.0.1
192.168.0.2
192.168.0.4
After you have a text file contains the computers list, you can go to Advanced Options window (Ctrl+O), choose the second option and type the computers list filename.

Command-Line Options

/LoadFrom Specifies the source to load from.
1 -> Load from a single MiniDump folder (/MiniDumpFolder parameter)
2 -> Load from all computers specified in the computer list file. (/ComputersFile parameter)
3 -> Load from a single MiniDump file (/SingleDumpFile parameter)
/MiniDumpFolder Start BlueScreenView with the specified MiniDump folder.
/MiniDumpFolder Start BlueScreenView with the specified MiniDump folder. (For using with /LoadFrom 3)
/ComputersFile Specifies the computers list filename. (When LoadFrom = 2)
/LowerPaneMode <1 -="" 3=""> Start BlueScreenView with the specified mode. 1 = All Drivers, 2 = Only Drivers Found In Stack, 3 = Blue Screen in XP Style.
/stext Save the list of blue screen crashes into a regular text file.
/stab Save the list of blue screen crashes into a tab-delimited text file.
/scomma Save the list of blue screen crashes into a comma-delimited text file (csv).
/stabular Save the list of blue screen crashes into a tabular text file.
/shtml Save the list of blue screen crashes into HTML file (Horizontal).
/sverhtml Save the list of blue screen crashes into HTML file (Vertical).
/sxml Save the list of blue screen crashes into XML file.
/sort This command-line option can be used with other save options for sorting by the desired column. If you don't specify this option, the list is sorted according to the last sort that you made from the user interface. The parameter can specify the column index (0 for the first column, 1 for the second column, and so on) or the name of the column, like "Bug Check Code" and "Crash Time". You can specify the '~' prefix character (e.g: "~Crash Time") if you want to sort in descending order. You can put multiple /sort in the command-line if you want to sort by multiple columns. Examples:
BlueScreenView.exe /shtml "f:\temp\crashes.html" /sort 2 /sort ~1
BlueScreenView.exe /shtml "f:\temp\crashes.html" /sort "Bug Check String" /sort "~Crash Time"
/nosort When you specify this command-line option, the list will be saved without any sorting.

Translating BlueScreenView to other languages

In order to translate BlueScreenView to other language, follow the instructions below:
  1. Run BlueScreenView with /savelangfile parameter:
    BlueScreenView.exe /savelangfile
    A file named BlueScreenView_lng.ini will be created in the folder of BlueScreenView utility.
  2. Open the created language file in Notepad or in any other text editor.
  3. Translate all string entries to the desired language. Optionally, you can also add your name and/or a link to your Web site. (TranslatorName and TranslatorURL values) If you add this information, it'll be used in the 'About' window.
  4. After you finish the translation, Run BlueScreenView, and all translated strings will be loaded from the language file.
    If you want to run BlueScreenView without the translation, simply rename the language file, or move it to another folder. 
Published By
S.G.Godwin Dinesh.MCA
Sr.System Administrator