Followers

How do I set different wallpapers for each monitor in Windows?

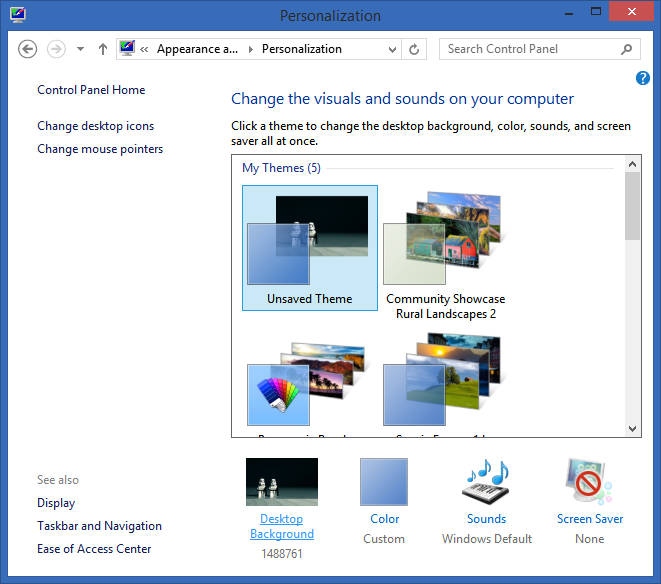
I wanted a different wallpaper (or "screensaver," for the non-technical relatives, because I know you call desktop wallpaper that) for each of my multiple monitors in Windows. To start changing your wallpaper, first right-click on the desktop on click Personalize.


Right click to Personalize

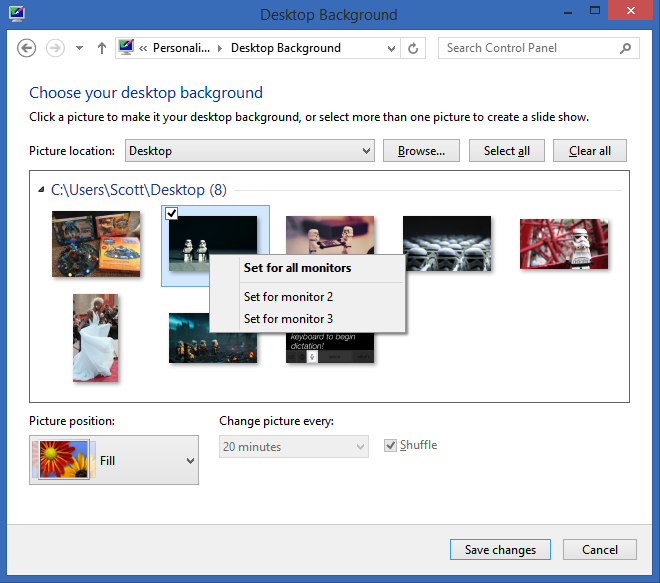
Click the words "Desktop Background" at the bottom of the Personalization dialog.
How to change your Desktop Background

Now, from here, if you LEFT-click a wallpaper you're selecting that wallpaper for ALL your monitors.
BUT, if you RIGHT-click on an image, you can set wallpapers individually.
Right click to set wallpaper individually


Published By
S.G.Godwin Dinesh.MCA
Sr.System Administrator
 

How to take back up of VMware ESXi 5.1?

REM * Backup VMware ESXi hosts configurations and MUST be executed from a vCLI command prompt.
REM * Written by Chandan Nuckched
REM * chandan@nuckched.com
REM * Copyright @Chandan Nuckched: You can share, copy, modify and use this script and promise not to take money in return and I still wants the credits :)
REM *
REM Display warning to run in vCLI command prompt only.
ECHO Please run this script only from VMware vCLI command prompt or else it will not work.
REM Getting and splicing today's date and assigning variables.
@For /F "tokens=1,2,3,4 delims=/ " %%A in ('Date /t') do @(
Set Day=%%A
Set Month=%%B
Set Date=%%C
Set Year=%%D
Set All=%%A-%%B-%%C-%%D
)
REM Getting and splicing time and assigning variables.
@For /F "tokens=1,2,3 delims=: " %%A in ('Time /t') do @(
Set Hour=%%A
Set Min=%%B
Set AMPM=%%C
Set Allm=%%A-%%B-%%C
)
REM Create today's backup directory
mkdir e:\VMware\%All%
REM Passwords for the VMware hosts for user root
ECHO This script will backup VMware hosts:
ECHO vmhost04, vmhost05, vmhost06, vmhost07
PAUSE
ECHO Enter root's password and press enter
SET /p P0=
cls
ECHO Got the Password
ECHO Now backing up VMware hosts:
REM
vicfg-cfgbackup.pl --username root --password %P0% -server vmhost04.test.com -s e:\VMware\%All%\vmhost04.backup.config.%All%_%Allm%
vicfg-cfgbackup.pl --username root --password %P0% -server vmhost05.test.com -s e:\VMware\%All%\vmhost05.backup.config.%All%_%Allm%
vicfg-cfgbackup.pl --username root --password %P0% -server vmhost06.test.com -s e:\VMware\%All%\vmhost06.backup.config.%All%_%Allm%
vicfg-cfgbackup.pl --username root --password %P0% -server vmhost07.test.com -s e:\VMware\%All%\vmhost07.backup.config.%All%_%Allm%

REM End

Published By
S.G.Godwin Dinesh.MCA
Sr.System Administrator

Right click on Windows icon and Explorer icon doesn't work in Windows 8.1

1. Download ShellExView v1.41 from the following link http://www.nirsoft.net/utils/shexview.zip 
Please Note: The third-party product discussed here is manufactured by a company that is independent of Microsoft. We make no warranty, implied or otherwise, regarding this product's performance or reliability.

2.  Extract "shexview.zip" file and open shexview.exe. It will scan the registry for all the shell extensions.

3. Select all the non-Microsoft extensions in pink by press "Ctrl" in the keyboard.

4. Click the "Disable Selected Items" on the toolbar and click Yes.

5. Restart your computer and check if the issue is resolved.


Published By
S.G.Godwin Dinesh.MCA
Sr.System Administrator

Thin Client

A thin client is a stateless, fanless desktop terminal that has no hard drive. All features typically found on the desktop PC, including applications, sensitive data, memory, etc., are stored back in the data center when using a thin client.


A thin client running Remote Desktop Protocols (RDP), like Citrix ICA and Windows Terminal Services, and/or virtualization software, accesses hard drives in the data center stored on servers, blades, etc. Thin clients, software services, and backend hardware make up thin client computing, a virtual desktop computing model.
Thin clients are used as a PC replacement technology to help customers immediately access any virtual desktop or virtualized application. Thin clients provide businesses a cost-effective way to create a virtual desktop infrastructure (VDI). Thin clients are utilized in various industries and enterprises worldwide that all have different requirements but share common goals. The cost, security, manageability, and scalability benefits of thin clients are all reasons that IT personnel are exploring –and switching– to thin clients.
Cost-wise, the price per seat of a thin client deployment has dropped to the point where it is more cost effective than regular PCs. This has been a claim that many in the thin client industry have made in the past, but the fact is that the technology that has been developed within the past year has made it a definitive reality.

Published By
S.G.Godwin Dinesh.MCA
Sr.System Administrator

BACKUP YOUR CRAP: Missing Operating System, Backups, Disk Images, Home Servers, BootRec, BootMgr, RebuildBCD, FixBoot and Problems, Plural

We were running a meeting and sharing screens and suddenly my laptop's little hard drive light started going issue.That's bad, but I've seen it before.

HanselmanDesktopDecember2010


I hit CTRL-ALT-DEL to bring up Task Manager, but nothing happened. About 30 seconds later I got a message from Windows saying basically "um, I totally see that you hit Ctrl-Alt-Del and I told that security screen to come up but him no worky."
I've seen this dialog literally like TWICE in my life. That's bad.
So I'm sitting there watching this light *BOOM* WHOA*** BLUE SCREEN.
Whoa! Ok, so it's writing out the memory dump....WHAT? Error Writing Dump, Hardware Failure, NO CARRIER...
I've never seen that. Ever.
I reboot.
BIOS says Hardware Device Error. The hard drive is dead. My year old $600 OCZ VerteX SSD that I bought myself and put in my work computer to be more productive is dead. And not dead in that plug it into another machine kind of dead. Not in a Super Nintendo blow hard on the contacts and reinsert kind of dead. Not in a Jonah Hex touch me and come back to life just for a minute dead. Not AMC's Walking Dead.
It's a coaster now.
I leave Quiznos that moment, walk over to the local computer shop and say "proprietor! Sell me your finest hard drive!" He has a single random 500gig 7200RPM laptop HD he sells me for $77.
I go home and boot off my Windows Home Server Restore CD. My machine was backed up this morning at 2am. Restore takes a few hours over wired Ethernet and I boot.
However...I forgot I had some 100meg System Partition on my laptop that isn't backed up, so I get No Operating System Found. Not to be confused with "Missing Operating System," this means that my machine was totally restored, except for the boot stuff that's needed. That was on that little 100 meg partition.
I boot into my Windows Disk, and when it comes up to the first menu, I hit SHIFT-F10. That brings up a command prompt. They hide it with that obscure hotkey because Captain, Thar Be Whales Here. You can get hurt.
I type
DISKPART
In case you haven't figured it out, if you find yourself typing DISKPART, EVER in your life, you've got problems. Plural.
Then from the prompt:
DISKPART> list disk
Disk ###  Status          Size   Free
--------  --------------- ------ -----
Disk 0    Online          465 GB   0 B

DISKPARK> select disk 0
Disk 0 is now the selected disk
DISKPART> list partition
Partition ###  Type       Size 
-------------  ---------  ------- 
Partition 1    Primary    465 GB

DISKPART> select partition 1
Partition 1 is now the selected partition
DISKPART> active
Partition 1 is now active
Then I reboot, startup with the Windows 7 DVD again and go back into the Windows Recovery console with F10 from the first dialog.
Now it's Boot Sector time, son!
I've got a Windows installation on C:\Windows on an active partition. That's the one I restored from a disk image, remember?
However, I've got no boot information, no master boot record (MBR) and no Boot Configuration Data (BCD.)
From the recovery command line:
BCDBOOT c:\windows
Then
BOOTREC /FIXMBR
BOOTREC /FIXBOOT
BOOTREC /REBUILDBCD

After this I rebooted and was greeted by the most beautiful sight I've seen today. My desktop. Exactly as it was this morning at 2am.
My other files? The ones I changed? Safe in DropBox and syncing from the cloud to my machine as we speak, Dear Reader.
Sure, I realize that all this command line partitioning was an edge case and not completely related to my whole message of "backup your stuff," but this was my afternoon, so I've shared it with you.

Conclusion

  • Have a backup strategy my friends. Not only that, but seriously, test your restores. Backups are great. I do them all the time. Backups always work. Restores fail all the time.
  • Backup some stuff to the cloud. I don't care whose cloud, pick one. I used to use Mozy, now I use KeepVault because it backs up my Windows Home Server to the cloud, as well as my desktops.
  • Make local disk images to external hard drives. I have a 2TB external drive that I make weekly images to use Acronis TrueImage. Just in case everything goes bad. If you are a presenter and traveler type like me, always be ready with a Virtual Machine on a USB Key or a Disk Image on a hard drive in case things go bad the night before a presentation.
  • You can make VHD (Virtual Hard Drive) images from physical disks for free with Disk2VHD if you're really fancy and advanced.
  • Given what's going on with Windows Home Server and Drive Extender, I don't know what to think. I can say though, that this is the fourth time that having a drive image (not just files backups) have had me typing on the same machine that died the very same day.
Source:
www.hanselman.com

Published By
S.G.Godwin Dinesh.MCA
Sr.System Administrator

Windows Server Patching Best Practices

Patching Requirements
Windows Server patches, hotfixes and service pack is critical for compliance, service level agreement and security purposes. Keeping an operating systems and application up to date is the key to align your infrastructure with latest software. Patches and hotfixes also enable you to prevent any security breaches and malware infection.
Windows Patch Classification
The following are strongly recommended patches:
  1. Critical
  2. Security
  3. Definition Updates for malware
  4. Service packs
Windows Product Classification
It is highly recommended that you patch Windows Servers, Windows Clients, Office, Applications (Silverlight, .Net Framework, SQL, Exchange, SharePoint, FF TMG).
Patching Groups
Consultants should take time to test the patches in a non-production environment prior to being deployed to production. This will help to gauge the impact of such changes. Ideally you will have the following patching groups:
1. UAT (UAT1, UAT2, etc)
2. Test Environment (Test1, Test2, etc)
3. Development Environment (Dev1, Dev2 etc)
4. Production (Prod1, Prod2, etc)
If you have clustered environment like SQL, Exchange and SharePoint then create Prod1, prod2 group and place each node on each group.
Change Management
System administrators should maintain a log, written or electronic, of all changes to the operating environment, to include hardware, system security software, operating system, and applications. Prior to any changes being implemented on a system, the system administrator should receive approval of stakeholders.
Backup
Why am I discussing backup with patching best practice? In case of emergency you can rollback completely and restore a server to its original state if necessary. It is very important that servers be backed up on a regular basis. Depending on the use of the server, it may be adequate to backup the server once per week. A backup of a more critical environment may be needed daily, and possibly continuously. The backup program provided with Windows is capable of backing up to virtually any writable media, which can include network drives provided by a server in another physical location. This program is also capable of scheduling backups which can ensure backups occur on a regular interval.
Microsoft strongly recommends that you create the following backups before you install an update rollup, service pack and patch on Exchange and SQL:
  • A full backup of all databases on the server.
  • A full backup of transaction log and log backup
  • A system state backup of the server.
  • A snapshot of virtualized exchange server. Delete snapshot after successful patching and updating.
Application Compatibility
Read release notes of each hotfixes you are going to apply so that you are compliant with the application installed on the server. Consult with application vendor before applying service pack to any server if the server is hosting specific business application. Consult with application engineer about the importance of server patching. Inform and educate application engineer as much as possible to avoid conflict of interest.
Documentation
Documentation released with the updates is usually in the form of web pages, attached Word documents and README.TXT files. These should be printed off and attached to change control procedures as supporting documentation.
Back out Plan
A back-out plan will allow the system and enterprise to return to their original state, prior to the failed implementation. It is important that these procedures are clear, and that contingency management has tested them, because in the worst case a faulty implementation can make it necessary to activate contingency options. Historically, service packs have allowed for uninstalling, so verify there is enough free hard disk space to create the uninstall folder. Create a back out plan electronically and attach with change management software.
User Notifications
You need to notify helpdesk staff and support agencies of the pending changes so they may be ready for arising issues or outages.
Consistency across Servers
Always install the same service packs or hotfixes to each SQL server node, Exchange DAG member and Domain Controller.
Routine Maintenance Window
A scheduled maintenance window must be agreed with business so that application outage and server reboot can maintain a respectable Service Level Agreement (SLA). If you have a large infrastructure with thousands of servers and many regions working round the clock then you must consider application dependencies. A patching schedule can be considered in between every Friday of every month at 6:00 P.M. Friday to 6:00 A.M Monday. Setup maintenance window in system center or deadline for WSUS to make sure patches are applied when you want instead of when patch is available. In this way you will have a complete control over change windows approved by change advisory board (CAB). Do not allow end users to update patches on their client machine according to their wishes and happiness! then user will never install any patch.
Patching Tools
I strongly recommend that you spend few $$$ to buy Microsoft System Center 2012 to manage and deploy Windows patches, service pack and hotfixes. However you can use Windows Server Update Services (WSUS) as poor man’s patching solutions.
Patching DMZ server can be accomplished using WSUS offline patching solutions available for free to download from http://download.wsusoffline.net/.
Automate, Automate and Automate!
Automated patch management using System Center could enable a single IT administrator to access a pre-populated patch policy. He then could execute the command and with the press of a single button, download the patches from Microsoft’s website, install them on a test machine and test for compatibility issues. Meanwhile, an automatic inventory check could search for systems with the affected software, wake them up, check their readiness and push the verified patches out to waiting machines. The patches would then be automatically installed on each system, and they’d reboot as necessary. The final step is an automated report on the status of the remediated devices.

Standardize Patch Management Processes
Standardized patch management processes could allow for daily assessment and remediation of client devices and weekly assessment and remediation for servers. Reports can then be generated to validate system status on a weekly or bi-weekly schedule. A systems monitoring task that used to take days now takes minutes, and patches are deployed more completely and consistently across the entire IT environment. A single IT administrator can proactively manage thousands of systems tasks in the same amount of time it took an entire team to do the tasks manually.
Reboot Windows Computer
Some application may require reboot of server before patching such as RSA Secure Console. However most of the server must be rebooted after patching. Do not suppress reboot after patching in any circumstances or you will have a messy environment and broken clusters.
X86 and X64 Windows Systems
The most prominent 32-bit application you’re likely to see on a 64-bit Windows system is Office. In this sort of situation System Center benefits most because you can adjust and make decision based on architecture and compliance as well. You can approve patches based on “Needed and Not Installed”. If a server or client need update it will install if not then it will not installed. It’s safe to do so.
Antivirus and Antispyware
Servers are vulnerable to many forms of attack. Implementation and standardization of security methods should be developed to allow early and rapid deployment on servers. It’s important that a Windows server be equipped with a latest centrally managed Antivirus program. Antivirus update must be scheduled with the same maintenance window to update antivirus with latest definition.
Audit Practices
Servers have a powerful auditing feature built in. Typically, server managers would want the auditing system to capture logins, attempted logins, logouts, administrative activities, and perhaps attempts to access or delete critical system files. Auditing should be limited to gathering just the information that is needed, as it does require CPU and disk time for auditing to gather information. Log Management software should be used, if possible, for ease of managing and analysing information. Report can be generated from Systems Center and WSUS as proof of patching cycle.
Log Retention
Servers keep multiple logs and, by default, may not be set to reuse log file entries. It is a good practice to expand the size of the allowed log file and to set it to reuse space as needed. This allows logging to continue uninterrupted. How far back your log entries go will depend on the size of the log file and how quickly you are accumulating log data. If your server environment is critical, you may wish to ensure that the log file size is sufficient to store about 30 days of logging information, and then rotate log files once per month.
Installing Updates on a single Exchange Server

Download Exchange Update from Microsoft Download Center. Record Current Exchange Version information
Check for publisher’s certificate revocation
1. Start Internet Explorer.
2. On the Tools menu, click Internet Options.
3. Click the Advanced tab, and then locate the Security section.
4. Clear the Check for publisher’s certificate revocation check box, and then click OK.
5. After the update rollup installation is complete, select the Check for publisher’s certificate revocation option.
Pre-check before installing
1. Determine which update rollup packages are installed on your Exchange server roles
2. Determine whether any interim updates are installed
3. Review interim updates
4. Obtain the latest update rollup package
5. Apply on a Test Exchange Server
Install Exchange Update
1. Ensure that you have downloaded the appropriate rollup to a local drive on your Exchange servers, or on a remote network share.
2. Run the Windows Installer *.msp Setup file that you downloaded in step 1.
Install Exchange Update on DAG Member
To update all DAG members, perform the following procedures on each DAG member, one at a time. Set the member server in maintenance mode using this PowerShell Command.
.StartDagServerMaintenance.ps1
Install the update rollup
1. Close all Exchange management tools.
2. Right-click the Exchange update rollup file (.msp file) you downloaded, and then select Apply.
3. On the Welcome page, click Next.
4. On the License Terms page, review the license terms, select I accept the License Terms, and then click Next.
5. On the Completion page, click Finish.
Once installed exit from maintenance mode run the StopDagServerMaintenance.ps1 script. Run the following command to re-balance the DAG, as needed
.RedistributeActiveDatabases.ps1 -DagName -BalanceDbsByActivationPreference -ShowFinalDatabaseDistribution
When the installation is finished, complete the following tasks:
  • Start the Services MMC snap-in, and then verify that all the Exchange-related services are started successfully.
  • Log on to Outlook Web App to verify that it’s running correctly.
  • Restore Outlook Web App customizations, and then check Outlook Web App for correct functionality.
  • After the update rollup installation is complete, select the Check for publisher’s certificate revocation option in Internet Explorer. See “Certificate Revocation List” earlier in this topic.
  • Check Exchange 2010 version information
  • View Update rollup in Control Panel>Programs and Features

Patching Microsoft Failover Cluster
You can install Windows service packs on Windows Server Failover Cluster nodes using the following procedure. Administrative privilege is required to perform the following tasks.
Procedure to install Windows service pack or hotfixes in Windows Server 2003:
  1. Check the System event log for errors and ensure proper system operation.
  2. Make sure you have a current backup and updated emergency repair disk for each system. In the event of corrupt files, power outage, or incompatibility, it may be necessary to revert back to the state of the system prior to attempting to install the service pack/hotfixes.
  3. Expand Node A, and then click Active Groups. In the left pane, right-click the groups, and then click Move Group to move all groups to Node B.
  4. Open Cluster Administrator, right-click Node A, and then click Pause Node.
  5. Install the service pack on Node A, and then restart the computer.
  6. Check the System event log for errors. If you find any errors, troubleshoot them before continuing this process.
  7. In Cluster Administrator, right-click Node A, and then click Resume Node.
  8. Right-click Node B, and then click Move Group for all groups owned by Node B to move all groups to Node A.
  9. In Cluster Administrator, right-click Node B, and then click Pause Node.
  10. Install the service pack on Node B, and then restart the computer.
  11. Check the system event log for errors. If you find any errors, troubleshoot them before continuing this process.
  12. In Cluster Administrator, right-click Node B, and then click Resume Node.
  13. Right-click each group, click Move Group, and then move the groups back to their preferred owner.
Procedure to install Windows service pack or hotfixes in Windows Server 2008 and Windows Server 2012:
  1. Check the event log for errors and ensure proper system operation.
  2. Make sure you have a current backup and updated emergency repair disk for each system. In the event of corrupt files, power outage, or incompatibility, it may be necessary to revert back to the state of the system prior to attempting to install the service pack/hotfixes.
  3. On Node A, Expand Services and Applications, and then click the service or application
  4. Under Actions (on the right), click Move this service or application to another node, then choose the node or select Best possible.
  5. In the Failover Cluster Manager snap-in, right-click Node A, and then click Pause.
  6. Install the service pack/hotfixes on Node A, and then restart the computer.
  7. Check the event log for errors. If you find any errors, troubleshoot them before continuing this process.
  8. In Failover Cluster Manager snap-in, right-click Node A, and then click Resume.
  9. Under Actions (on the right), click Move this service or application to another node, then choose the node.
    Note: As the service or application moves, the status is displayed in the results pane (in the center pane). Follow the Step 9 and 10 for each service and application configured on the cluster.
  10. Install the service pack/hotfixes on Node B, and then restart the computer.
  11. Check the event log for errors. If you find any errors, troubleshoot them before continuing this process.
  12. From the Failover Cluster Manager snap-in, right-click Node B, and then click Pause.
  13. In Failover Cluster Manager, right-click Node B, and then click Resume.
  14. Right-click each group, click Move Group, and then move the groups back to their preferred owner.
You can use the following PowerShell Cmdlet to accomplish the same.
1. Load the module with the command: Import-Module FailoverClusters
2. Suspend (Pause) activity on a failover cluster nodeA: Suspend-ClusterNode nodeA
3. Move a clustered service or application (a resource group) from one node to another: Get-ClusterNode NodeA | Get-ClusterGroup | Move-Cluster Group
4. Resume activity on nodeA that was suspended in step 5: Resume-ClusterNode nodeA
5. Move a clustered service or application (a resource group) from one node to another: Get-ClusterNode NodeB | Get-ClusterGroup | Move-Cluster Group
6. Suspend (Pause) activity on other failover cluster node: Suspend-ClusterNode nodeB
7. Resume activity on nodeB that was suspended in step 10 above: Resume-ClusterNode nodeB


Conclusion
It is critical that when service packs, hotfixes, and security patches are required to be installed, that these best practices be followed.
Bottom line
1. Read all related documents.
2. Use a change control process.
3. Apply updates that are needed.
4. Test patches and hotfixes on test environment.
5. Don’t get more than 2 service packs behind.
6. Target non-critical servers first.
7. Service Pack (SP) level consistency.
8. Latest SP instead of multiple hotfixes.
9. Apply only on exact match.
10. Subscribe to Microsoft email notification.
11. Always have a back-out plan.
12. Have a working Backup and schedule production downtime.
13. Consistency across Domain Controllers and application servers.

Published By
S.G.Godwin Dinesh.MCA
Sr.System Administrator


Mandatory Profile

1.) Make a local user on the server (Windows Server 2008 R2 in my environment)
2.) Make the user member of the local administrators group on your server
3.) Login in with this user and customize for example the start menu
4.) Logoff and login again with an administrator account
5.) Create a share on your file server. For example \\SRV-RDSDC-01\TSmandatory
6.) For share permissions choose Everyone Full Control, NTFS permissions choose Authenticated Users Read
7.) Turn off Caching on this share
8.) Copy the complete template folder from the C:\Users directory to the new TSmandatory share
9.) Rename the template folder to TSmandatory.V2
You have to add the .V2 in the name of your folder, because it’s the new profile type in Windows Server 2008 and 2008 R2!
10.) Delete the Local and Local Low folders from the AppData folder
11.) The next step is to add the right permissions on the mandatory profile
12.) Open REGEDIT and load the NTUSER.DAT hive
13.) Right-click on the TS Mandatory profile and choose permissions
14.) Delete the template user and add the Authenticated Users (Full Control)
15.) Unload the NTUSER.DAT from your registry
16.) Rename the NTUSER.DAT to NTUSER.MAN
17.) When you configure a GPO to specify the location of the Mandatory profile, you’ve to choose to following location:
\\SRV-RDSDC-01\TSmandatory\TSmandatory without the .V2!

Published By
S.G.Godwin Dinesh.MCA
Sr.System Administrator
Guide to Installing and Booting Windows 8 Developer Preview off a VHD (Virtual Hard Disk)

I've posted before about my intense love for Booting off a VHD (Virtual Hard Disk). It's lovely. Of course, once Hyper-V on the client happens, it will matter less, but for now, here I am, a guy with a perfectly good, working Windows 7 machine who wants to also run the Windows 8 Developer Preview.
New Windows 8 Boot Manager?


I could do a few things to play with Windows 8. I could:
  • Try a virtualization solution, but it might not work, I may not have the drivers I need and it won't be as shiny as running "on the metal."
  • Sacrifice a machine I have lying around. I'll probably do that at some point, but I'd like to try it out on my actual hardware that I use all day long.
  • Swap out my C: drive and use my main machine. I don't have a tool-less case, and I'm also very lazy, so, um, ya.
  • Dual boot. Dual booting may feel ninja but it ALWAYS ends on tears. And sometimes blood.
  • Boot on real hardware from a Virtual Hard Disk.
Booting off a VHD is my current preferred solution for trying crazy stuff because the only speed hit I'll take is on the virtualized hard drive. Everything else is real hardware. I do this all the time with presentation VHDs and one-off daily builds of stuff.

Warranty

Of course, this is just some dude's blog. I puzzled this out and while booting to VHD is supported, messing with your boot manager - especially with Preview (that means, NOT RELEASE QUALITY) Software is a recipe for losing your job and a messy divorce. There's no warranty, express or implied. If you quake in fear from the following instructions, you need to STOP. It may be the case that you are actually a Non-Technical Friend and you don't realize it. Well, someone just told you. Please don't destroy your hard drive. I don't know you and I don't how how you got here. Stop calling. Jimmy no live here, you no call back!

Booting a Windows 8 VHD off a Windows 7 Primary System

Whew, now that's out of the way, let's void a few warranties, shall we?
Please note that there are a half dozen ways to do this. You can do it all from the command line using tools like ImageX, DISM, etc, or you can do a lot of it graphically with tools like BellaVista. This is just the way I did it. It's not gospel. I'm sure the folks in the comments will have much nicer ways. Take them all with a nice grain of sea salt. You can also SYSPREP the VHD directly from the ISO's WIM with IMAGEX if you know what that stuff means. It's a little subtle and requires you go get some tools. While my process  is a little baroque, it just needs the one ISO->USB tool.

Step 0 - Have a lot of Disk Space

I like to have a roomy VHD. You can make one that expands or you can make a fixed size. 40 gigs is usually enough, but I like 60 gigs as a nice round number, plus this is the Windows 8 Developer Preview with Developer Tools. If you don't have enough space when an expandable disk "bloats" itself to the fixed size on boot, it'll blue screen, so expandable or not, have the slack space.

Step 1 - Make a USB stick or DVD from the ISO

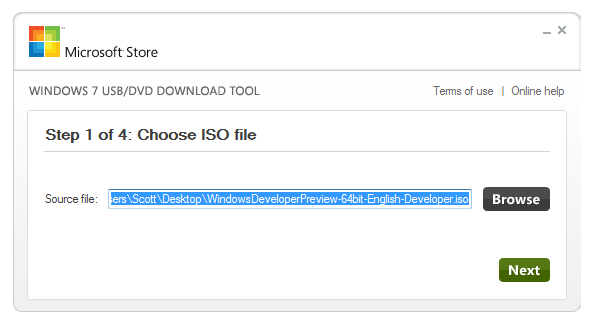
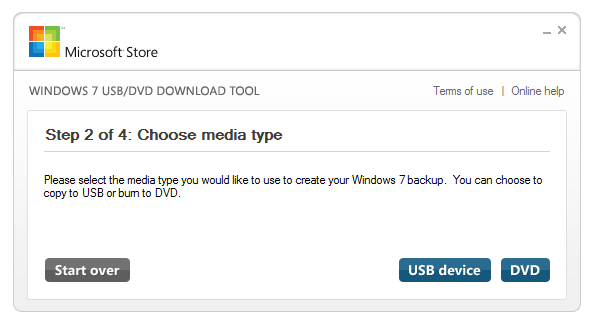
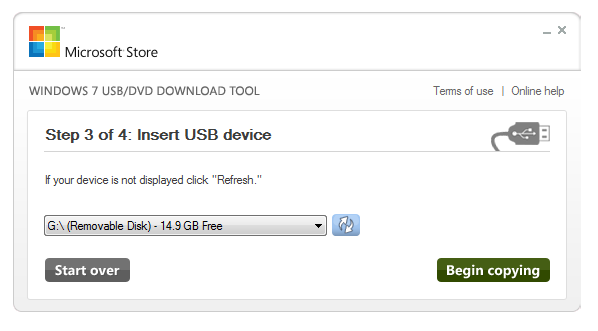
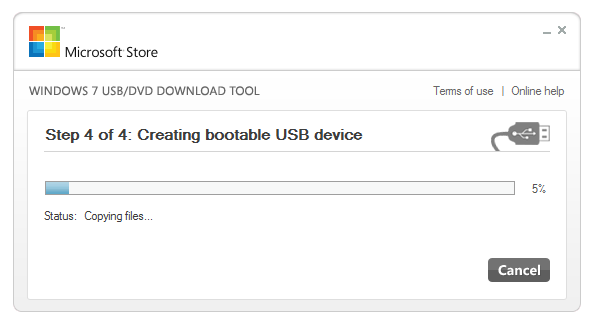
Go get the Windows 7 USB/DVD download tool and get yourself a USB stick that will hold at LEAST 10 gigs. I used a 16 gig one. Go through the process by pointing at the ISO you downloaded and then preparing your USB key. You can also use the resulting USB key to boot and install Windows 8 from your sacrificial hardware if you like.
Choose ISOChoose Media TypeInsert USB deviceCreating Bootable USB device

Step 2 - Make a Virtual Hard Drive

You can do this later in the process by pressing Shift-F10 while in the Setup Tool, but I like to prep things up front. You can do it from the Disk Management GUI or from DISKPART at the Administrator command line.
Be aware that your VHD needs to be on an internal drive or SATA drive. USB won't work as the drivers are initialized too late in the boot process.
Also, if your machine is BitLockered, your VHD needs to be on a non-BitLockered partition and you need to suspend BitLocker during this process. Also, know your recovery key because I don't know it.

2a. Start up an Administrator Console and run DISKPART. Execute the lines after DISKPART> below, changing them for your own system.

C:\Users\Scott\Desktop>diskpart

Microsoft DiskPart version 6.1.7601
Copyright (C) 1999-2008 Microsoft Corporation.
On computer: HEXPOWER7

DISKPART> create vdisk file=d:\VMs\Win8.vhd type=expandable maximum=60000

  100 percent completed

DiskPart successfully created the virtual disk file.

DISKPART> select vdisk file=d:\VMs\Win8.vhd

DiskPart successfully selected the virtual disk file.

DISKPART> attach vdisk

  100 percent completed

DiskPart successfully attached the virtual disk file.

DISKPART> create partition primary

DiskPart succeeded in creating the specified partition.
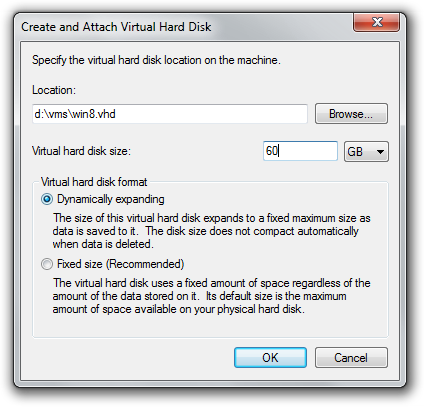
2b. OR do it from the Disk Management GUI:
Create and Attach Virtual Hard Disk
At this point, you've got a VHD that's empty, but ready to have Windows installed to it. The VHD and your system are NOT ready to be booted from. That will come in a minute.

Step 3 - Boot off the Windows 8 USB Key

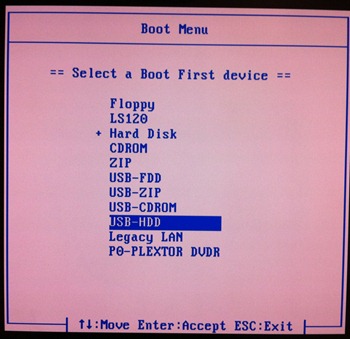
Now, restart your computer with your new USB key plugged in and startup your BOOT MENU. The hotkey is usually F12 to bring it up. You want to boot off the Windows 8 USB key.
Side Note: Folks with Gigabyte Motherboards. These motherboards are notoriously hard to figure out a USB boot. You need to make sure that you USB key is only plugged into the board directly in the back. Then, don't use the Boot Menu, it never works. Instead, enter the BIOS with the DEL key and manually put your USB Key (it'll be detected by brand, so be prepared to recognize the string) at the top of the Hard Drive boot order.
Boot of your USB key

Step 4 - Attach the VHD while still inside SETUP

Pay attention here. Actually, hell, pay attention to the whole thing, it's subtle.
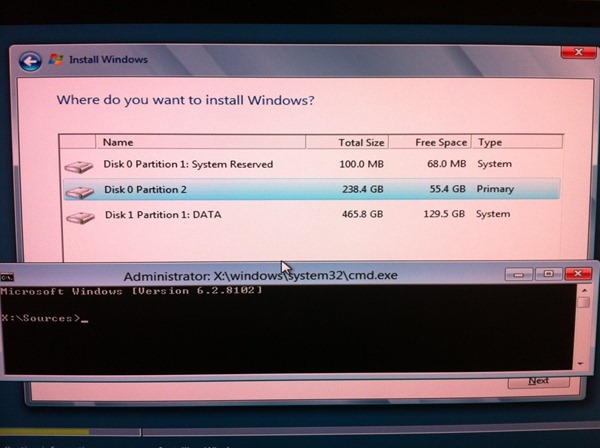
Start the SETUP process, click Install Not but DO NOT PICK A HARD DRIVE. As shown in this screenshot, instead hit SHIFT-F10 to get to a console. We want to attach our VHD and install to THAT instead.
Shift-F10 from within Windows 8 Setup
In the screenshot above I haven't touched anything, yet.
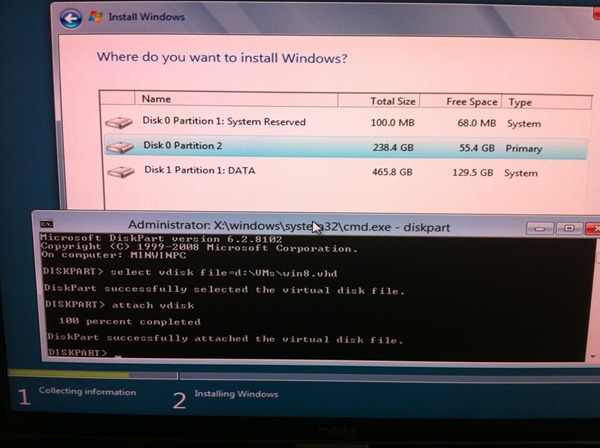
Below, I've run DISKPART and selected and attached the VHD with these now familiar commands:
DISKPART> select vdisk file=d:\VMs\Win8.vhd
DISKPART> attach vdisk
That will look like this screenshot.
DISKPART commands have been issued, but the drives aren't refreshed yet
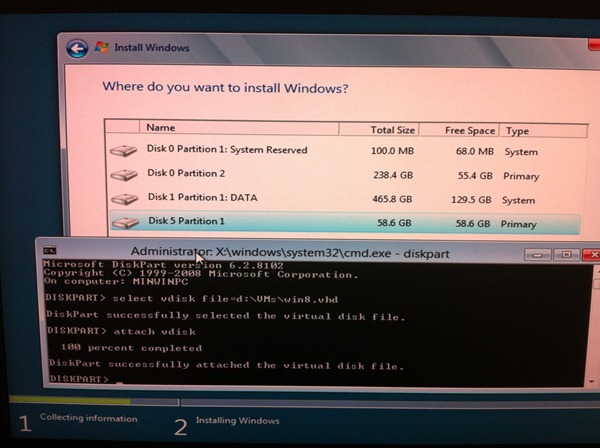
Next, ALT-TAB back over to the list of disks and hit REFRESH. You'll see your VHD show up. Mine is the 60 gig one. That's the blank we are going to install to.
Now the 60 gig VHD is visible
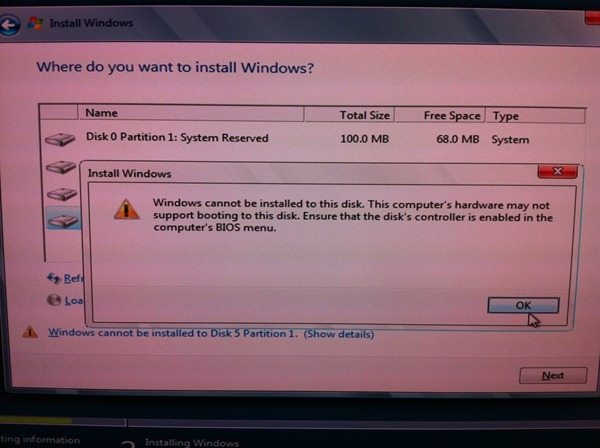
Note that installation will warn you that this VHD can't be booted to. Yet. That's cool, go ahead and install to that empty VHD.
photo 4
At some point it'll ask you to restart the computer. The setup process isn't done yet, but go ahead and reboot and remove the USB key.
Your system should reboot and setup will continue, this time off the VHD.
NOTE: I had expected at this point to go and manually create a BCD entry using BCDEDIT.EXE from an Administrator command line as I did in my first post on booting to VHD but it seems that is all done for us now!

The Windows 8 Developer Preview build automatically noticed that I was trying to boot off a VHD and added a Windows Bootloader option and put the description in as "Windows Developer Preview," saving me a half dozen tedious steps. I was very pleasantly surprised! I'd like to hear if you had the same experiences, Dear Reader.

I could tell it was working because my C: drive is a totally silent SSD and my D: drive is spinning rust. When the setup continued I could totally hear the hard drive that holds the VHD spinning. The installation completed happily at this point with me having to manually create an entry with BCDEDIT.

I confirmed it with bcdedit.exe /v while running Windows 8 Developer Preview.
Setup completed, and I rebooted again to make sure I could get back into Windows 7.
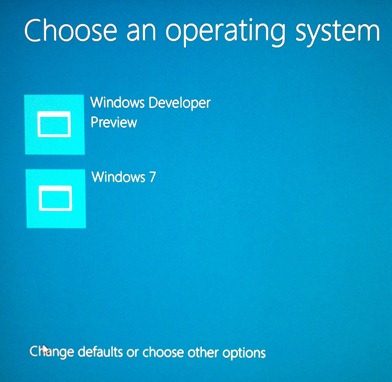
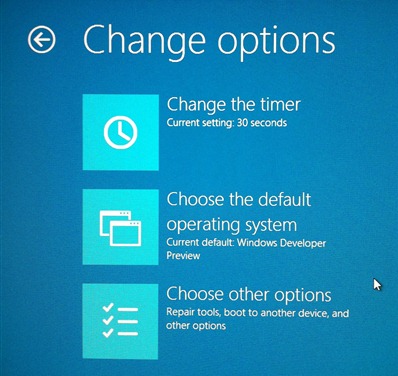
In fact, I was shocked to find a completely new bootloader had come into play. I was literally open-mouthed staring at it. It's not text, it's graphical and friendly! It actually and literally "did the right thing." Awesome.
This seems to be the Windows 8 boot manager that you'll see if Windows 8 Developer Preview is the default. Otherwise you'll see the Windows 7 text-mode one first. Very cool. I hope it stays past the Developer Preview.
New Windows 8 Boot Manager?
Here's what you get if you click Other Options.
New Windows 8 Boot Manager?
That's it. To recap:
  1. Make an empty VHD
  2. Attach to the VHD just before installing Windows 8 Developer Preview
  3. Install to the VHD
  4. Rejoice
Hope this works for you, Dear Reader. I'm happily booting Windows 8 Developer Preview to VHD today.

Published By
S.G.Godwin Dinesh.MCA
Sr.System Administrator
Windows 8, Step 0 - Turn on continuous backups via File History

So you've installed Windows 8. I'm going to do a small series of posts called "Windows 8, Step 0" with tips on what to be sure to do after you've installed Windows.
Here's an important TODO for you. Do it NOW. Do it all your machines, especially Non Technical Family Member's machine. Take that giant external USB drive you've got lying around and plug it in.
From within the Windows 8 Start Screen, type "File History" then click "Settings"
File History in Settings
Click it. Turn on File History and point it to your giant external drive, or some large network share that you have available.
File History is ON
This is kind of like Time Machine on a Mac. It will keep a constant shadow of your files backed up to this other drive. It runs automatically and you don't think about it until you lose something. It will automatically backup anything and everything in your Libraries (including Documents, Photos, Videos, Music) and everything on your Desktop.
If you want to backup more specific stuff, add whatever files you want to your Windows Libraries. I've added photos from another drive, for example as well as Documents from my DropBox folder.
image
You can click Advanced Settings there on the left to control how long the files are kept, how much disk space is used and how often it happens.
My File History runs hourly and uses 5% of the drive
I've also checked the box under HomeGroup to automatically recommend this large drive to the rest of the house! This is awesome for a few reasons. Other machines in the HomeGroup will automatically see this drive and can use it just by clicking "Turn on."
In the screenshot below you can see the File History dialog from my laptop with the 3TB drive from my other machine called HEXPOWER7 being recommended as a good drive for File History. One click, now my files are backed up on this machine.
File History from another computer recommends the main HomeGroup machine
HomeGroups are groups of computers at home that you trust and want to share files and devices with. You can make a HomeGroup in less than a minute. From the Start Screen, type "HomeGroup" then Click "Settings." Follow the instructions.
If you want, you can click Select Drive and pick any drive on your machine or add a network location. I have a 5TB Synology NAS so I could use that also. Any Windows-compatible SMB/Samba NAS will do.
File History to a NAS
Now I'm backing up to the Network Attached Storage (NAS).
File History on my NAS

Restoring from File History

Once you've been running File History for a while, you can go back to the Start Screen and type "Restore Your Files" and click "Settings" to get this dialog:
Restore File History with my files in a scrolling calendar
There's folder I want from my Desktop but it's not there as I've deleted it before. I will click the back button (you can hold it down to go back in time fast) until I get to a day when that file existed. I can also search my entire File History for previous versions of files.
I've backed up to November 6th and there's the file on my Desktop.
An old file from the past
Just click the green back-in-time Restore button and it's put back where it was. I can also restore it to a specific new place if I want to.

Published By
S.G.Godwin Dinesh.MCA
Sr.System Administrator

Backing Up the Server_To Schedule a Backup for a Later Time or Date


To Schedule a Backup for a Later Time or Date
You may want to run a backup operation when there is low system usage. However, such times may be late at night or on weekends. You can schedule backup jobs to run on a particular day and time.

NOTE: To schedule a backup operation, the Task Scheduler service must be running.
1.       Click Start, point to All Programs, point to Accessories, point to System Tools, and then click Backup. The Backup or Restore Wizard starts.
2.       Click Advanced Mode.
3.       Click the Backup tab.
4.       On the Job menu, click New.
5.       Expand the drive or folder that contains the items that you want to back up. Click to select the check boxes next to the files, folders, or drives that you want to back up.
6.       In the Backup destination box, specify the destination for the new job. To do so, do one of the following:
o    If you want to back up files and folders to a file, click File.
o    If you want to back up to tape, click a tape device.

NOTE: If a tape device is not connected to your computer, File is the only backup media type that is available in the Backup destination box.
7.       In the Backup media or file name box, do one of the following:
o    If you are backing up to a file, specify a path and file name for the backup (.bkf) file. Or, click Browse, specify a file name and location where you want to save the file, and then click Save.
o    If you are backing up to tape, click the tape that you want to use.
8.       On the Tools menu, click Options. Specify any additional backup options that you want on the appropriate tabs of theOptions page. Click OK.
9.       Click Start Backup.
10.    Click Schedule.

If a message prompts you to save your current backup selections, click OK. On the Save As page that appears, specify a name and location where you want to save the backup, and then click Save.
11.    In the Job name box, type a name for the scheduled backup job, and then click Properties.
12.    Click the Schedule tab. In the Schedule Task box, click how frequently you want the backup job to run, and then in theStart time box, specify a time when you want the backup to run, and then click OK.
13.    On the Set Account Information page that appears, type a user name and password of the user whom you want to run the scheduled backup for, and then click OK.
14.    Click OK.

The backup job that you scheduled appears on the calendar on the Schedule Jobs tab. The scheduled backup job automatically starts at the time and data that you specified.
15.    Close the Backup Utility page.