Followers

A service does not start, and events 7000 and 7011 are logged_Windows Server 2008 R2

Symptoms
When you start a computer that is running Windows Server 2003, Windows Server 2008, or Windows Server 2008 R2, a service does not start, and the following error events appear in the Application log:

Event 1
Event Type: Error
Event Source: Service Control Manager
Event Category: None
Event ID: 7000

The ServiceName service failed to start due to the following error:
The service did not respond to the start or control request in a timely fashion.
Event 2
Event Type: Error
Event Source: Service Control Manager
Event Category: None
Event ID: 7011

Description:
Timeout (30000 milliseconds) waiting for a transaction response from the ServiceName service.
Event 3
Event Type: Error
Source: Service Control Manager
Event ID: 7009
Task Category: None

A timeout was reached (30000 milliseconds) while waiting for the ServiceName service to connect.
Workaround
Important This section, method, or task contains steps that tell you how to modify the registry. However, serious problems might occur if you modify the registry incorrectly. Therefore, make sure that you follow these steps carefully. For added protection, back up the registry before you modify it. Then, you can restore the registry if a problem occurs. For more information about how to back up and restore the registry, click the following article number to view the article in the Microsoft Knowledge Base:
322756 How to back up and restore the registry in Windows


To work around this problem, modify the registry to increase the default time-out value for the service control manager. To increase this value to 60 seconds, follow these steps:
  1. Click Start, click Run, type regedit, and then click OK.
  2. Locate and then click the following registry subkey:
    HKEY_LOCAL_MACHINE\SYSTEM\CurrentControlSet\Control
  3. In the right pane, locate the ServicesPipeTimeout entry.

    Note If the ServicesPipeTimeout entry does not exist, you must create it. To do this, follow these steps:
    1. On the Edit menu, point to New, and then click DWORD Value.
    2. Type ServicesPipeTimeout, and then press ENTER.
  4. Right-click ServicesPipeTimeout, and then click Modify.
  5. Click Decimal, type 60000, and then click OK.

    This value represents the time in milliseconds before a service times out.
  6. Restart the computer.
Note This workaround may resolve the problem where the service does not start. However, we recommend that you research this problem to determine whether it is a symptom of another problem.
 
Source:
www.microsoft.com
 
Published By
S.G.Godwin Dinesh.MCA
Sr.System Administrator

My SQL -Hot copy

mysqlhotcopy
FormatDescription
--addtodestDo not rename target directory (if it exists); merely add files to it
--allowoldDo not abort if a target exists; rename it by adding an _old suffix
--checkpointInsert checkpoint entries
--chrootBase directory of the chroot jail in which mysqld operates
--debugWrite debugging log
--dryrunReport actions without performing them
--flushlogFlush logs after all tables are locked
--helpDisplay help message and exit
--hostConnect to MySQL server on given host
--keepoldDo not delete previous (renamed) target when done
--methodThe method for copying files
--noindicesDo not include full index files in the backup
--passwordPassword to use when connecting to server
--portTCP/IP port number to use for connection
--quietBe silent except for errors
--regexpCopy all databases with names that match the given regular expression
--resetmasterReset the binary log after locking all the tables
--resetslaveReset the master.info file after locking all the tables
--socketFor connections to localhost, the Unix socket file to use
--tmpdirThe temporary directory
--userMySQL user name to use when connecting to server

Active Directory Migration from Windows Server 2008 R2 to Windows Server 2012 R2

Step 1: Preparing your existing forest via the adprep command
 

  1. Insert the Windows Server 2012 DVD into the DVD drive of the Windows Server 2008 R2 AD DS.
  2. Open command prompt, and type adprep /forestprep and press enter.
     
  3. Check the Schema version of AD DS (After adprep) by running regedit, navigating to Computer\HKEY_LOCAL_MACHINE\SYSTEM\CurrentControlSet\services\NTDS\Parameters and noting the current Schema version.
     
Step 2: Promoting the Windows Server 2012 Server domain controller
 

  1. Complete Step-By-Step: Adding a Windows Server 2012 Domain Controller to an Existing Windows Server 2003 network

Step 3: Verify the new Windows Server 2012 Domain Controller
  1. Open Active Directory Users and Computers, expand and click the Domain Controller OU to verify your server is listed.
     
  2. Open DNS Manager, right-click on , select Properties and then click Name Servers Tab. Verify that your server is listed in Name Servers: lists.
     
  3. Open Active Directory Sites and Services; verify that your server is listed in Servers under Default-First-Site-Name.

Step 4: Transferring the Flexible Single Master Operations (FSMO) Role


  1. Open the Active Directory Users and Computers console on your new Windows Server 2012 computer.
     
  2. Right click your domain and select Operations Masters in the sub menu.
     
  3. In the Operations Masters window, ensure the RID tab is selected.
     
  4. Select the Change button.


  5. Select Yes when asked about transferring the operations master role.
     
  6. Once the operations master role has successfully transferred, click OK to continue.
     
  7. Ensure the Operations Master box now shows your new 2012 Windows Server.
     
  8. Repeat steps 4 to 6 for the PDC and Infrastructure tabs.
     
  9. Once completed, click Close to close the Operations Masters window.
     
  10. Close the Active Directory Users and Computers window.


Step 5: Removing the Windows 2008 R2 domain controller
  1. On the Windows 2008 R2 server click Start, Click Run, type dcpromo, then click OK.
     
  2. After the Welcome to the Active Directory Installation Wizard page, be sure to leave the Delete the domain because this server is the last domain controller in the domain unchecked.
     
  3. On the Administrator Password Page, enter your password and click Next.
     
  4. On the Summary page, click Next, wait for the process to end, then click Finish.
     
  5. On the Completing the Active Directory Domain Services Installation Wizard, click Finish.
     
  6. On the Active Directory Domain Services Installation Wizard page, click Restart Now to Restart the server.
     
  7. After the reboot is completed, delete the Windows Server 2008 R2 server from the domain to a workgroup and remove any unnecessary record from Active Directory Sites and Services.

Active Directory Domain Services

 Windows Server 2012 and 2012 R2

a) Server Core role has enhance in 2012 server. Role available 12 out of 19 role.
2008 - 9 role, 2008 R2- 10 role

b) New feature has been added in 2012 server
"User Interfaces and Infrastructure"

Installing this feature you can decide if you want to work in Core or GUI mode. No need to reinstall for interchange of core or gui.
c) SQl server can be run in 2012 server core , SQL server can't be install in 2008 & 2008 R2 server core

d) Server Manager Interface has change significantly
From Server manager you can configure roles for multiple servers “All servers tab”
Right click "All servers"--- add server…
From "ADDS" tab you can see Active directory with services running, events, performance everything in one window view.

e) Storage Spaces
You can add multiple hard drives (internal & external) to create storage pool and later you can assign drive to that storage pool.
This support Redundancy. If any hd fails -no data loss
Supports thin provisioning (means- disk space on the drive is only required when it is needed) [disk Space is used when it is required]

f) Second generation FS has been introduced
ReFS (Resilient File System) - Self healing feature (automated recovery in corrupted file-live)
ReFS don't support Booting (system drive can't use)
Only can be used in data drive
Don't support Disk Quotas
Does not support EFS Encryption and compression
ReFS will work only in Windows 8 and Server 2012(new feature)

g) New protocol has been introduced for network file sharing
# SMB 3.0 with High Availability feature
Suppose user is not able to reach file share, they will be redirected to other network file share location with same data. User will not able to understand
# Transparent failover

 h) Hyper-V has “1st generation configuration” & “2nd generation configuration” option, dynamic memory allocation


Basic difference between 2008 R1 and 2008 R2
The following changes are available in Windows Server 2008 R2:
Live migration with no down time
Dynamic virtual machine storage
Enhanced processor support (Multi core-- more than 64 core)
Enhanced networking support

  a) Windows Server 2008 is 32 bit (R1) & Windows Server 2008 R2 is 64 bit

b) Windows Server 2008 supports 8 cores processor and
Server 2008 R2 supports multi core processors, more than 64 core processors

c) Virtualization and power management has enhanced

d) Better utilization of multi core

e) Offline domain joins in Server 2008 R2

f) Quick migration (downtime was required may be 30 sec or a minute) in 2008 &Live migration in server 2008 R2 (zero down time)- Paused option is there .

Published By
S.G.Godwin Dinesh.MCA
Sr.System Administrator

Windows Server 2012 File and Storage Services Management


Handle a new disk

You find new discs in the Server Manager under

  • File and Storage Services
  • Volumes
  • Disks


Files and Storage under Windows Server 2012

Here you find several functionality which you might know from
former versions under "Disk Management". Disk Management is still available,
just choose
Files and Storage under Windows Server 2012

  • Tools

  • Computer Management
in Server Manager.
You can't choos partition style in Server Manager. To choose
partition style use Disk Manager.

Create a virtual disk

For creating virtual disks via GUI use Disk Management.
Files and Storage under Windows Server 2012
A other way to create virtual disks is via the command diskpart.


Notice the difference!
  • VHD up to 2040 GB
  • VHDX up to 64 TB, can only be accessed in Windows Server
    2012 or later
Virtual disks are also shown in Server Manager under
  • File and Storage Services
  • Volumes
  • Disks


Storage Pools under Windows Server 2012

To create a Storage Pool go to Server Manager under

  • File and Storage Services
  • Volumes
  • Storage Pools
and click on

  • Tasks
  • New Storage Pool
Files and Storage under Windows Server 2012

This is the PowerShell Command for it.


NewStoragePool
First the Storage Pool is just a pool of one or more disks. Things get
interesting if you create a pool with at least two disks.


Files and Storage under Windows Server 2012
If you create a New Virtual Disk afterwards creating the storage
pool...
Files and Storage under Windows Server 2012
...you get the following options:
Files and Storage under Windows Server 2012
Let Windows explain the types:
Simple
Files and Storage under Windows Server 2012
Mirror
Files and Storage under Windows Server 2012
Parity
Files and Storage under Windows Server 2012
As in former versions you can create RAID Volumes (quiet
similiar to Mirror or Parity Virtual Disks) in Computermanagement - Disk
Management.
Storage Pool are more flexilbel than volumes. You can I. E. add
more disks later.

Sharing Files

Sharing files the traditional way

You can share files the traditional way...

  • Right click on the folder to share

  • Click on Advanced Sharing

Files and Storage under Windows Server 2012

Sharing files with Server Manager

...or you use Server Manager
Be shure to have the roles

  • File Server

  • Server for NFS
under File and Storage Services installed.
Files and Storage under Windows Server 2012
To share a folder within Server Manager choose

  • File and Storage Services

  • Shares

  • Tasks

  • New Share
You see the following screen
Files and Storage under Windows Server 2012
As you might no you ca do NFS shares in Windows Server 2012. SMB
Quick and NFS Quick are for quick konfiguration. The Advanced features are for
further settings, i.e. Quoatas.
You need to have "File Server Resource Manager" Role installed
for Advanced Features.
You need to have "Server for NFS" installed for making NFS
shares.

Access-based enumeration

I think "access-baed enumeration" is a intersting feature. With
this option enabled users see only the files, to which they have access.

Published By
S.G.Godwin Dinesh.MCA
Sr.System Administrator

Installation of Openfiler

Introduction

This document describes the process of installing Openfiler using the default graphical installation interface. If you experience any problems with the graphical install track, such as a garbled screen due to the installer not being able to auto-detect your graphics hardware, please try a text-based install. The text-based install track is described here.
Total time for installation is about 15 - 20 minutes including software installation to disk.

System Requirements

Openfiler has the following hardware requirements to be successfully installed:
  1. x64 based computer with at least 4GB RAM and 12GB storage for the OS image.
  2. At least one supported network interface card
  3. A CDROM or DVD-ROM drive if you are performing a local install
  4. A supported disk controller with data drives attached.
Please see full system requirements information here.

Installation

The installation process is described with screenshots for illustrative purposes. If you are unable to proceed at any point with the installation process or you make a mistake, use the Back button to return to previous points in the installation process. Any errors or intractable problems with the installation process should be reported either to the Openfiler Users mailing list or, alternatively, if you feel you have found a bug please use the bug tracking system. If you report a bug, be sure to enter a valid email address so that you can keep track of any updates to it right up to resolution. You *must* first register with the bug tracker in order to be able to post a new bug.

Starting the Installation

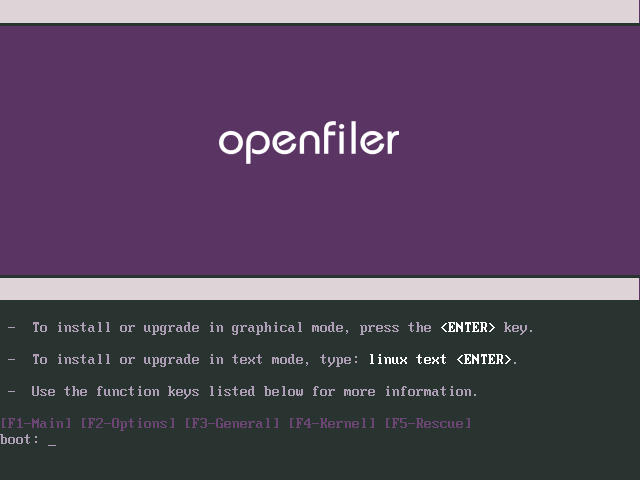
To begin the installation, insert the Openfiler disk into your CD/DVD-ROM drive and ensure your system is configured to boot off the CD/DVD-ROM drive. After the system POSTs, the installer boot prompt will come up. At this point, just hit the Enter key to proceed.
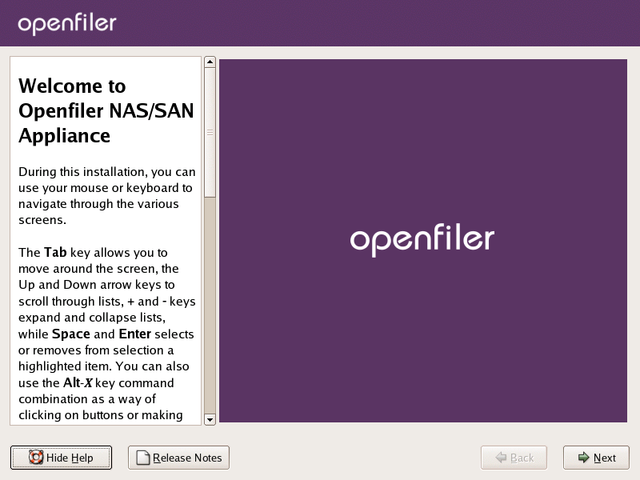
After a few moments, the first screen of the installer will be presented. If at this point your screen happens to be garbled, it is likely that the installer has been unable to automatically detect your graphics subsystem hardware. You may restart the installation process in text-mode and proceed accordingly in that case. The first screen of the installer is depicted below. The next step is to click on the Next button to proceed with the installation.
Graphical installation: Proceed

Keyboard Selection

This screen deals with keyboard layout selection. Use the scroll bar on the right to scroll up and down and select your desired keyboard layout from the list. Once you are satisfied with your selection, click the Next button to proceed.

Disk Partitioning Setup

Next comes the disk partitioning.  You must select manual disk partitioning as it ensures you will end up with a bootable system and with the correct partitioning scheme. Openfiler does not support automatic partitioning and you will be unable to configure data storage disks in the Openfiler graphical user interface if you select automatic partitioning. Click the Next button once you have selected the correct radiobutton option.


Disk Setup

On the disk setup screen, if you have any existing partitions on the system, please delete them. DO NOT DELETE ANY EXISTING OPENFILER DATA PARTITIONS UNLESS YOU NO LONGER REQUIRE THE DATA ON THEM. To delete a partition, highlight it in the list of partitions and click the Delete button. You should now have a clean disk on which to create your partitions.


You need to create three partitions on the system in order to proceed with the installation:
  1. "/boot" - this is where the kernel will reside and the system will boot from
  2. "swap" - this is the swap partition for memory swapping to disk
  3. "/"- this is the system root partition where all system applications and libraries will be installed
Create /boot Partition
Proceed by creating a boot partition. Click on the New button. You will be presented with a form with several fields and checkboxes. Enter the partition mount path "/boot" and the select the disk on with to create the partition. In the illustrated example, this disk is hda (the first IDE hard disk). Your setup will very likely be different as you may have several disks of different types. You should make sure that only the first disk is checked and no others. If you are installing on a SCSI-only system, this disk will be designated sda. If you are installing on a system that has both IDE and SCSI disks, please select hda if you intend to use the IDE disk as your boot drive.
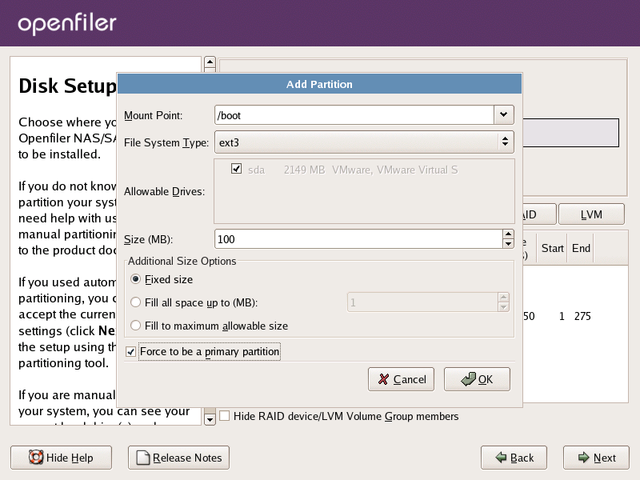
The following is a list of all entries required to create the boot partition:
  1. Mount Point: /boot
  2. Filesystem Type: ext3
  3. Allowable Drives: select one disk only. This should be the first IDE (hda) or first SCSI disk (sda)
  4. Size(MB): 100 (this is the size in Megabytes, allocate 100MB by entering "100")
  5. Additional Size Options: select Fixed Size radiobutton from the options.
  6. Force to be a primary partition: checked (select this checkbox to force the partition to be created as a primary partition)
After configuration, your settings should resemble the following illustration:
Once you are satisfied with your entries, click the OK button to create the partition.
Create / (root) Partition
Proceed by creating a root partition. Click on the New button. You will be presented with the same form as previously when creating the boot partition. The details are identical to what was entered for the /boot partition except this time the Mount Point: should be "/" and the Size(MB): should be 2048MB or at a minimum 1024MB.

Once you are satisfied with your entries, click the OK button to proceed.
Create Swap Partition
Proceed by creating a swap partition. Click on the New button. You will be presented with the same form as previously when creating the boot and root partitions. The details are identical to what was entered for the boot partition except this time the Mount Point: should swap. Use the drop down list to select a swap partition type. The Size(MB): of the partition should be at least 1024MB and need not exceed 2048MB.

Once you are satisfied with your entries, proceed by clicking the OK button to create the partition. You should now have a set of partitions ready for the Openfiler Operating System image to install to. Your disk partition scheme should resemble the following:
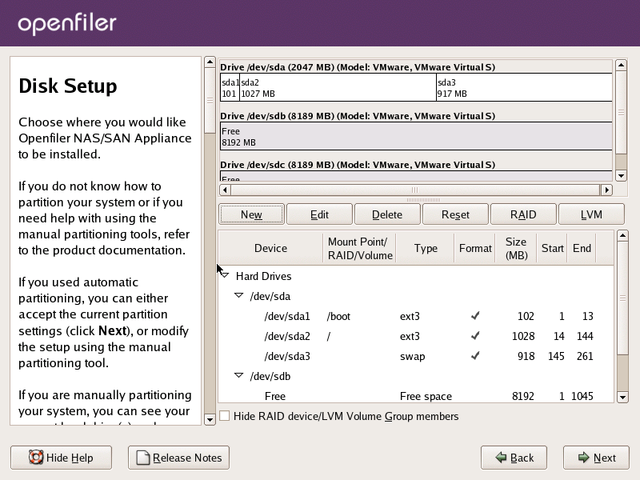
Graphical Installation: final partition scheme
You have now completed the partitioning tasks of the installation process and should click Next to proceed to the next step.

Network Configuration

In this section you will configure network devices, system hostname and DNS parameters. You will need to configure at least one network interface card in order to access the Openfiler web interface and to serve data to clients on a network. In the unlikely event that you will be using DHCP to configure the network address, you can simply click Next and proceed to the next stage of the installation process.
Graphical Installation: final partition scheme
If on the other hand you wish to define a specific IP address and hostname, click the Edit button at the top right corner of the screen in the Network Devices section. Network interface devices are designated ethX where X is a number starting at 0. The first network interface device is therefore eth0. If you have more than one network interface device, they will all be listed in the Network Devices section.
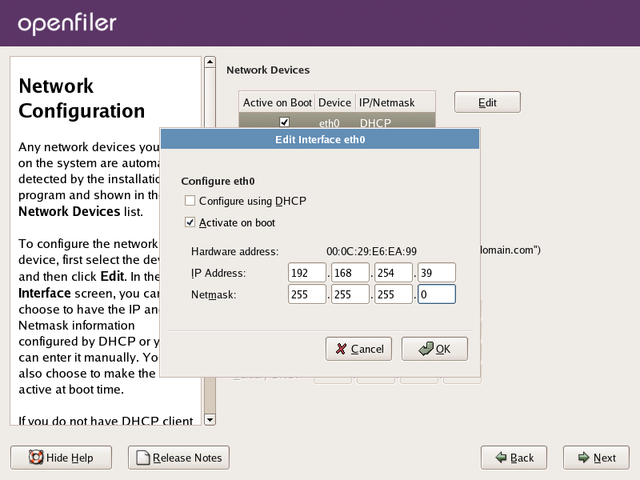
When you click the Edit button, a new form will popup for you to configure the network device in question. As you do not wish to use DHCP for this interface, uncheck the Configure Using DHCP checkbox. This will then allow you to enter a network IP address and Netmask in the appropriate form fields. Enter your desired settings and click OK to proceed.
Once you have configured a network IP address, you may now enter a hostname for the system. The default hostname localhost.localdomain is not suitable and you will need to enter a proper hostname for the system. This will be used later when you configure the system to participate on your network either as an Active Directory / Windows NT PDC client or as an LDAP domain member server. You will also, at this point, need to configure gateway IP address and DNS server IP addresses. To complete this task you will need the following information:
  1. Desired hostname - this is the name you will call the system. Usually this will be a fully qualified hostname e.g homer.the-simpsons.com .
  2. Gateway IP address - this is the IP address of your network gateway to allow routing to the Internet
  3. Primary DNS Server - this is the DNS server on your network. Note that if you intend to use Active Directory or LDAP as your authentication mechanism, you will need to assign a functional DNS IP address so that the authentication mechanism is able to resolve the authentication server hostnames.
  4. Secondary/Tertiary DNS Server - enter a second and third DNS server if they are available on your network.
The following illustration shows an example where a hostname has been assigned, and gateway IP, primary and secondary DNS information has also been entered.
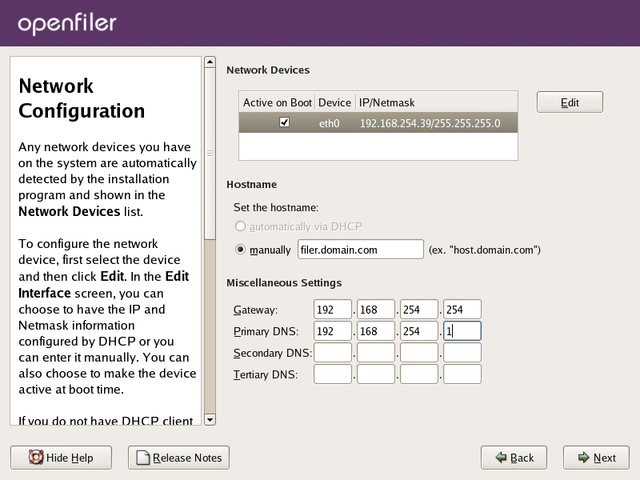
Once you are satisfied with your entries, please proceed by clicking the Next button.

Time Zone Selection

Set the default system time zone. You can achieve this by following the instructions on the left side of the screen. If your system BIOS has been configured to use UTC, check the UTC checkbox at the bottom of the screen and click Next to proceed.
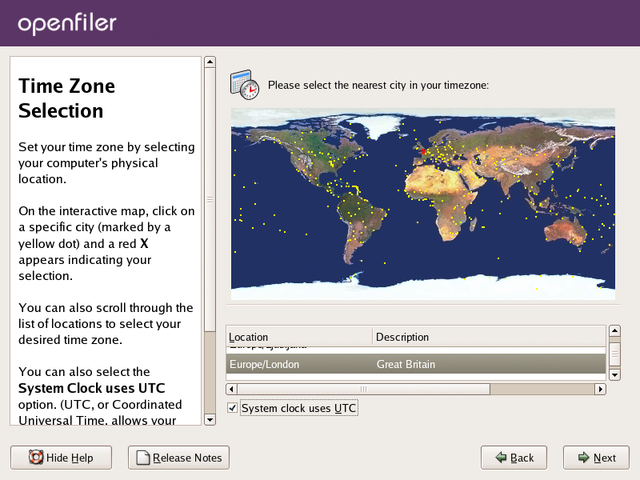
Set Root Password

You need to configure a root password for the system. The root password is the superuser administrator password. With the root account, you can log into the system to perform any administrative tasks that are not offered via the web interface. Select a suitable password and enter it twice in the provided textboxes. When you are satisfied with your entries, click Next to proceed with the installation process.
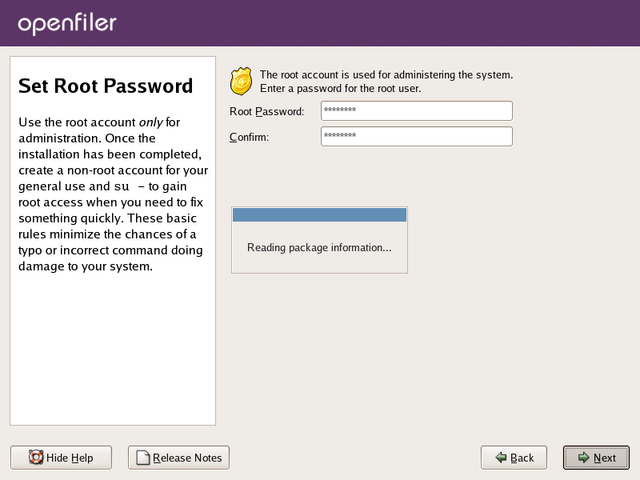
NB: the root password is meant for logging into the console of the Openfiler server. The default username and password for the Openfiler web management GUI are: "openfiler" and "password" respectively.

About To Install

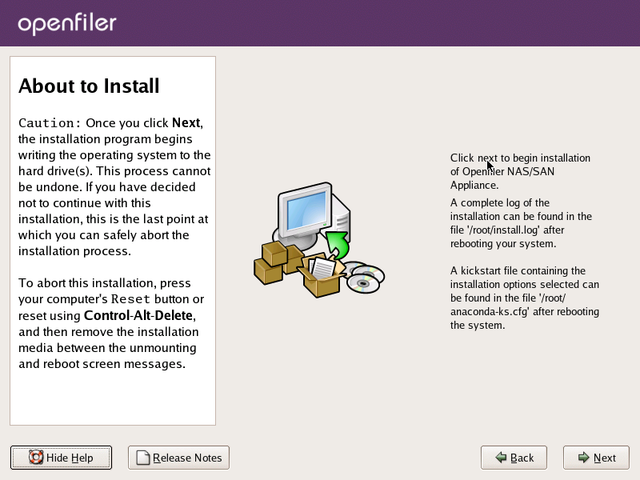
This screen informs you that installation configuration has been completed and the installer is awaiting your input to start the installation process which will format disks, copy data to the system and configure system parameters such as setting up the boot loader and adding system users. Click Next if you are satisfied with the entries you have made in the previous screens.

Note

You cannot go back to previous screens once you have gone past this point. The installer will erase any data on the partitions you defined in the partitioning section.
Installation

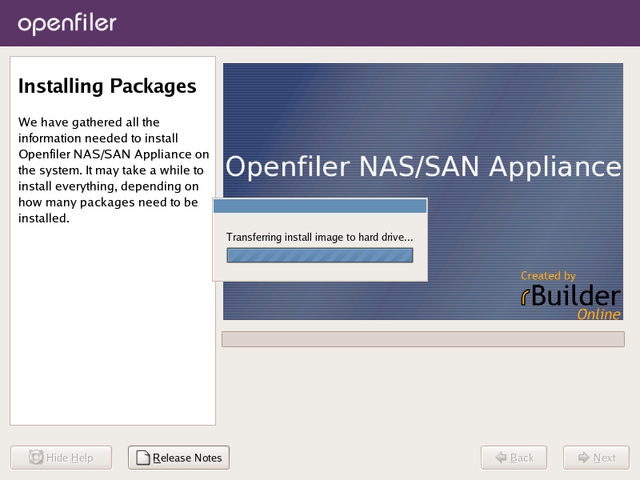
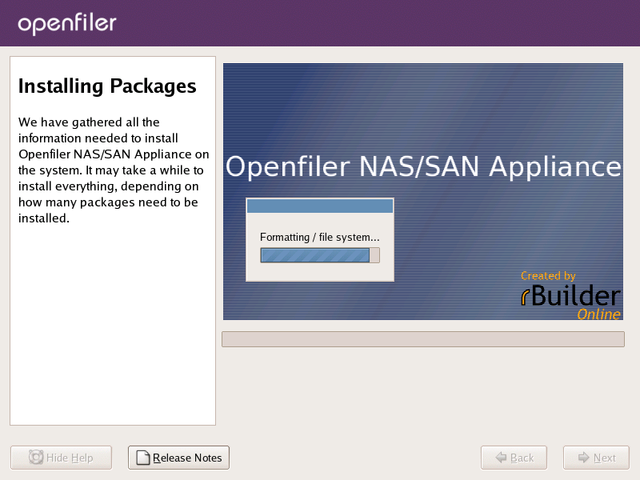
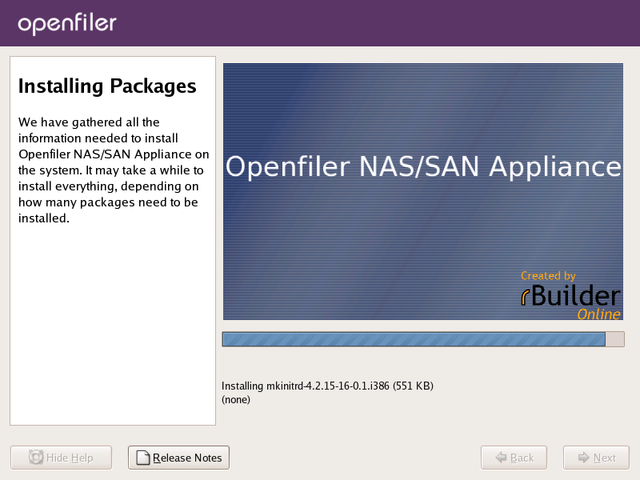
Once you have clicked Next in the preceding section, the installer will begin the installation process. The following screenshots depict what happens at this point.


Installation Complete

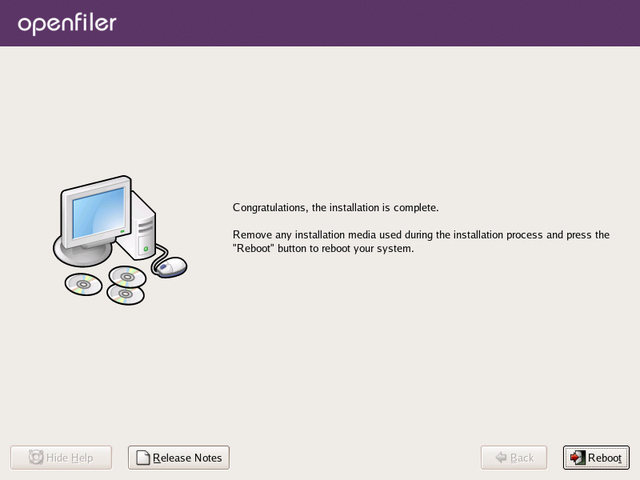
Once the installation has completed, you will be presented with a congratulatory message. At this point you simply need to click the Reboot button to finish the installer and boot into the installed Openfiler system.

Note

After you click Reboot remove the installation CD from the CD/DVD-ROM drive.
Once the system boots up, start configuring Openfiler by pointing your browser at the host name or IP address of the Openfiler system. The interface is accessible from https port 446. e.g..
Management Interface: https://:446
Administrator Username: openfiler
Administrator Password: password
You can learn how to manage the Openfiler system by browsing the administrator guide online which can be found.

 Source :
 https://www.openfiler.com

Published By
S.G.Godwin Dinesh.MCA
Sr.System Adminstrator

DCOM Error Messages & How to Fix the Issue

This issue occurs because the Microsoft Search (MSSearch) service starts before the Web Storage System starts, and the Microsoft Search service tries to automatically start the Web Storage System by using distributed COM (DCOM). The Web Storage System is secured to prevent programs from starting the Web Storage System with DCOM; therefore, an error is recorded when the Microsoft Search service tries to do so.

The Web Storage System does not allow programs to automatically start the Web Storage System, to prevent it from being started without the server operator's knowledge when the server operator has stopped it for maintenance or other reasons.

IMPORTANT: Do not change your DCOM settings to allow programs to automatically start the Web Storage System.

Microsoft uses the Distributed Component Object Model as a method to allow client-side (or local) applications to transmit and request data on a server. It is an integrated part of Windows, and is used by most Windows applications that connect to a network, including the Internet. It's used to perform silent authentications (sending login credentials with cached information) and to get live data updates for things like stock tickers and push notifications on applications. A large number of DCOM errors are the result of out-of-date login credentials, which return a "connection timed out" error message -- or, if no error message shows up, a browser or other networked application giving an "unable to load content" message.

Fix the DCOM Instruction:

    a) Log in to your computer with an administrator-level account.

    b) Open the Start screen, click the "Apps" icon and then enter "Component Services" into the search box. Press "Enter." Windows will start the Component Services Snap-In application, which is part of the Microsoft Management Console framework. The application will have a pane of options on the left-hand side.

   c) Double-click "Component Services," then navigate to "Computers," then "My Computer," then "DCOM Config" and finally "Microsoft Windows Remote Shell Host." Right-click "Microsoft Windows Remote Shell Host" and select "Properties" from the context-menu. A window will appear.

    d) Click the check box next to "Enable Distributed COM on this computer." Turn them off, click "OK" and turn them back on again, clicking "OK" a second time.

    e) Check to see if this has resolved your issue. If it hasn't, there is a chance that the DCOM problem will resolve itself with a full system reboot after this procedure.

Published By
S.G.Godwin Dinesh.MCA
Sr.System Administrator
How to Fix a DCOM Error

Microsoft uses the Distributed Component Object Model as a method to allow client-side (or local) applications to transmit and request data on a server. It is an integrated part of Windows, and is used by most Windows applications that connect to a network, including the Internet. It's used to perform silent authentications (sending login credentials with cached information) and to get live data updates for things like stock tickers and push notifications on applications. A large number of DCOM errors are the result of out-of-date login credentials, which return a "connection timed out" error message -- or, if no error message shows up, a browser or other networked application giving an "unable to load content" message.

Instructions

  1. Log in to your computer with an administrator-level account.
  2. Open the Start screen, click the "Apps" icon and then enter "Component Services" into the search box. Press "Enter." Windows will start the Component Services Snap-In application, which is part of the Microsoft Management Console framework. The application will have a pane of options on the left-hand side.
  3. Double-click "Component Services," then navigate to "Computers," then "My Computer," then "DCOM Config" and finally "Microsoft Windows Remote Shell Host." Right-click "Microsoft Windows Remote Shell Host" and select "Properties" from the context-menu. A window will appear.
  4. Click the check box next to "Enable Distributed COM on this computer." Turn them off, click "OK" and turn them back on again, clicking "OK" a second time.
  5. Check to see if this has resolved your issue. If it hasn't, there is a chance that the DCOM problem will resolve itself with a full system reboot after this procedure


Read more : http://www.ehow.com/how_7467534_fix-dcom-error.html

Microsoft uses the Distributed Component Object Model as a method to allow client-side (or local) applications to transmit and request data on a server. It is an integrated part of Windows, and is used by most Windows applications that connect to a network, including the Internet. It's used to perform silent authentications (sending login credentials with cached information) and to get live data updates for things like stock tickers and push notifications on applications. A large number of DCOM errors are the result of out-of-date login credentials, which return a "connection timed out" error message -- or, if no error message shows up, a browser or other networked application giving an "unable to load content" message.

Read more : http://www.ehow.com/how_7467534_fix-dcom-error.html