Along with the all the new stuff in Windows 8
that you either hate or love like the Start screen and missing start
button, there are a lot of background features that are really good and
useful. One of those features is Storage Spaces. So what are storage spaces and how can you use them in Windows 8 and Windows 8.1?
Storage Spaces basically allow you to take multiple hard drives and combine them into storage pools and storage spaces (I’ll explain the difference later) and use them to either create fast scratch storage or redundant data storage. In classic Microsoft style, it’s all about making the process so easy and simple that anyone can do it.
While it’s extremely easy to work with and does a great job overall, the super-simplification of a normally complex problem does cause some issues. Luckily, if you know a few things ahead of time before you create storage spaces, you’ll love this new feature.
You can connect a whole host of different drive types including USB, SATA, SCSI, iSCSI, SSD and SAS. Not only that, but the drives don’t have to be the same size. If you have ever played around with a standard RAID device, you’ll know that it normally requires all the drives to be the same size. Not so with storage spaces.
After you have a pool of disks, you can create storage spaces on top of the pool. Each space shows up as a logical disk drive in Windows. You can then use it like you could any other drive. When you create a storage space, you’ll have three options:
Simple (no resiliency) – You would use a simple storage space for data you want to be able to write to disk fast, but not have backed up. This kind of drive is called a scratch disk and can be used for video editing or for large image files, etc. Use only for fast disk writes. This is equivalent to RAID 0 for those who know the technical stuff.
Two-way/Three-way Mirror – This is the best option and basically writes data to either two disk or three disks simultaneously, so that you have multiple copies of your data. Two-way mirroring requires at least 2 drives and three-way mirroring requires at least 5 drives. Five drives are needed because it has to protect your data in case of two hard drive failures. This is equivalent to RAID 1.
Parity – With parity, you need at least 3 hard drives and you’ll end up getting more space than if you used mirroring. However, parity causes a performance drop due to the algorithms used to read and write the data to the disks. You’ll get less space using mirroring, but faster performance. This is equivalent to RAID 5.
When it comes to Storage Spaces, Parity has some horrific write speeds, which pretty much makes it not worth using. Normally, parity (RAID 5) is great and used all the time on servers, but that’s because it’s hardware RAID. With storage spaces, all of this is done using software. Software RAID is considerably slower and in this particular case, it’s very slow. Hopefully, it’s something Microsoft eventually fixes because it would be the best option were if not for the speed.
The other issue with Parity mode is that if you use the wrong number of disks or wildly varying sizes for the disks, you’ll get no errors, but you’ll run into all kinds of problems. The champs over at Ars Technica explain in detail with their tests, but basically the data is not re-balanced properly if you use 3 disks and when adding new disks to the pool. So disks that are already close to full become full even though you might add a new disk that has lots of free space.

Now you need to choose the disks you want to use for your storage pool. The disks do not have to be formatted beforehand.

Once you have selected the disks, go ahead and click on Create pool. This will create your storage pool and the next screen will bring you to Create a storage space dialog.

Here you can give your name disk a name, choose the drive letter, choose the file system and more. By default, it is set to NTFS, but you can also pick REFS, which stands for Resilient File System and it going to be the future file system for Windows in a couple of years. REFS is still in development and should only be used if you really know the technical details behind it, otherwise just stick with NTFS for now. Check out this post for some background on REFS and also more details about storage spaces.
Under Resiliency Type, you’ll see the options that I had mentioned at the beginning of the article. In my case, I have two hard drives, so I’m going to use Two-way Mirror. The original size of the disks were 10 GB each and with two-way mirror we only get about 18.5 GB to use for creating storage spaces due to overhead cost. Since it’s an exact copy on both drives, we only get half of that 18.5 GB (8.75) to actually use for data storage. With parity, you would get around 12 to 13 GB, but with the performance hit.
There is an option called Size that you can change and it states you can make the storage space larger than the actual storage pool. So what does that mean and why would you want to do it? I could change the value to 30 GB and it’ll show up as a 30 GB disk in Windows. However, when it starts filling up close to 8.75 physical limit, you can simply add another disk to increase the space. I personally don’t find this very useful as you can forget how much space you actually have.
Also, the system does not give you warnings when you are reaching close to the limit unless you open Storage Spaces manually. That’s a problem because once the physical disk is full, the whole drive just unmounts and disappears. So I suggest just leaving the size value to be exactly the amount of physical space there actually is.

That’s pretty much it! Now the disk will show up and you can start copying data to the drive. You can rest assured your data is now being backed up on multiple disks! It’s definitely a very powerful feature for the average consumer. With hard drive prices so cheap these days, you can easily add a couple of disks to your desktop and either increase performance or increase redundancy.

Now when you go back into the storage spaces dialog, you’ll see the status for your current storage pool. You can see how much space is being used and add additional drives, if necessary.
Overall, it’s a great feature and works very well, except in a few instances related to parity, which hopefully gets fixed in the near future. If you have any questions about setting up a storage space on Windows 8 or Windows 8.1, post a comment and I’ll try to help. Enjoy!
Storage Spaces basically allow you to take multiple hard drives and combine them into storage pools and storage spaces (I’ll explain the difference later) and use them to either create fast scratch storage or redundant data storage. In classic Microsoft style, it’s all about making the process so easy and simple that anyone can do it.
While it’s extremely easy to work with and does a great job overall, the super-simplification of a normally complex problem does cause some issues. Luckily, if you know a few things ahead of time before you create storage spaces, you’ll love this new feature.
What Can You Create with A Storage Space?
First, let’s talk about what you can actually accomplish with a storage space. To get started, you have to create a Storage Pool. These is basically a collection of disks of different types and sizes that will act as a pool of storage.You can connect a whole host of different drive types including USB, SATA, SCSI, iSCSI, SSD and SAS. Not only that, but the drives don’t have to be the same size. If you have ever played around with a standard RAID device, you’ll know that it normally requires all the drives to be the same size. Not so with storage spaces.
After you have a pool of disks, you can create storage spaces on top of the pool. Each space shows up as a logical disk drive in Windows. You can then use it like you could any other drive. When you create a storage space, you’ll have three options:
Simple (no resiliency) – You would use a simple storage space for data you want to be able to write to disk fast, but not have backed up. This kind of drive is called a scratch disk and can be used for video editing or for large image files, etc. Use only for fast disk writes. This is equivalent to RAID 0 for those who know the technical stuff.
Two-way/Three-way Mirror – This is the best option and basically writes data to either two disk or three disks simultaneously, so that you have multiple copies of your data. Two-way mirroring requires at least 2 drives and three-way mirroring requires at least 5 drives. Five drives are needed because it has to protect your data in case of two hard drive failures. This is equivalent to RAID 1.
Parity – With parity, you need at least 3 hard drives and you’ll end up getting more space than if you used mirroring. However, parity causes a performance drop due to the algorithms used to read and write the data to the disks. You’ll get less space using mirroring, but faster performance. This is equivalent to RAID 5.
When it comes to Storage Spaces, Parity has some horrific write speeds, which pretty much makes it not worth using. Normally, parity (RAID 5) is great and used all the time on servers, but that’s because it’s hardware RAID. With storage spaces, all of this is done using software. Software RAID is considerably slower and in this particular case, it’s very slow. Hopefully, it’s something Microsoft eventually fixes because it would be the best option were if not for the speed.
The other issue with Parity mode is that if you use the wrong number of disks or wildly varying sizes for the disks, you’ll get no errors, but you’ll run into all kinds of problems. The champs over at Ars Technica explain in detail with their tests, but basically the data is not re-balanced properly if you use 3 disks and when adding new disks to the pool. So disks that are already close to full become full even though you might add a new disk that has lots of free space.
Setting up a Storage Space
To get started, open the Charms bar in Windows 8 and search for storage spaces. You’ll start off by creating a storage pool: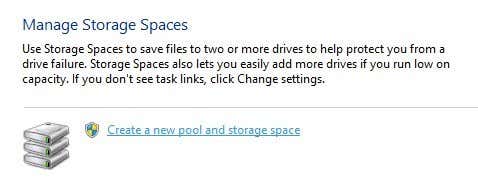
Now you need to choose the disks you want to use for your storage pool. The disks do not have to be formatted beforehand.
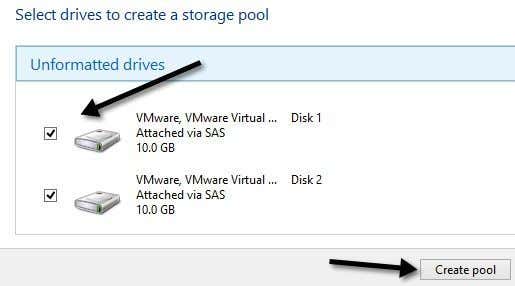
Once you have selected the disks, go ahead and click on Create pool. This will create your storage pool and the next screen will bring you to Create a storage space dialog.
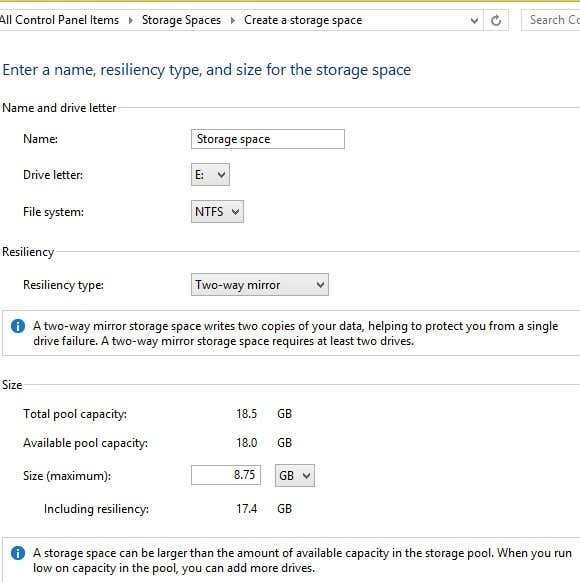
Here you can give your name disk a name, choose the drive letter, choose the file system and more. By default, it is set to NTFS, but you can also pick REFS, which stands for Resilient File System and it going to be the future file system for Windows in a couple of years. REFS is still in development and should only be used if you really know the technical details behind it, otherwise just stick with NTFS for now. Check out this post for some background on REFS and also more details about storage spaces.
Under Resiliency Type, you’ll see the options that I had mentioned at the beginning of the article. In my case, I have two hard drives, so I’m going to use Two-way Mirror. The original size of the disks were 10 GB each and with two-way mirror we only get about 18.5 GB to use for creating storage spaces due to overhead cost. Since it’s an exact copy on both drives, we only get half of that 18.5 GB (8.75) to actually use for data storage. With parity, you would get around 12 to 13 GB, but with the performance hit.
There is an option called Size that you can change and it states you can make the storage space larger than the actual storage pool. So what does that mean and why would you want to do it? I could change the value to 30 GB and it’ll show up as a 30 GB disk in Windows. However, when it starts filling up close to 8.75 physical limit, you can simply add another disk to increase the space. I personally don’t find this very useful as you can forget how much space you actually have.
Also, the system does not give you warnings when you are reaching close to the limit unless you open Storage Spaces manually. That’s a problem because once the physical disk is full, the whole drive just unmounts and disappears. So I suggest just leaving the size value to be exactly the amount of physical space there actually is.
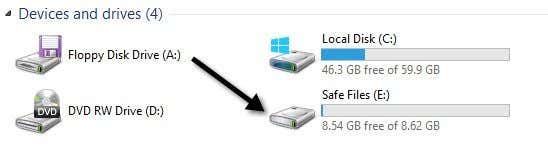
That’s pretty much it! Now the disk will show up and you can start copying data to the drive. You can rest assured your data is now being backed up on multiple disks! It’s definitely a very powerful feature for the average consumer. With hard drive prices so cheap these days, you can easily add a couple of disks to your desktop and either increase performance or increase redundancy.
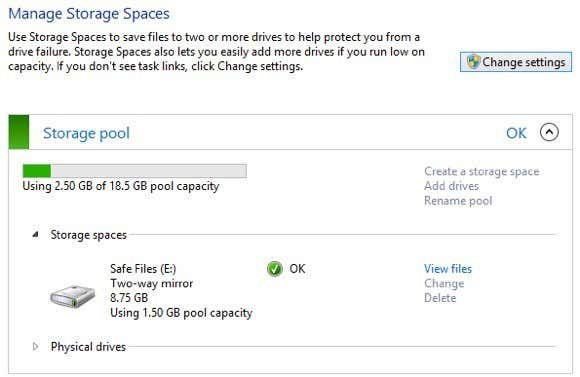
Now when you go back into the storage spaces dialog, you’ll see the status for your current storage pool. You can see how much space is being used and add additional drives, if necessary.
Overall, it’s a great feature and works very well, except in a few instances related to parity, which hopefully gets fixed in the near future. If you have any questions about setting up a storage space on Windows 8 or Windows 8.1, post a comment and I’ll try to help. Enjoy!
Published By
S.G.Godwin Dinesh.MCA
Sr.System Administrator
Sr.System Administrator
No comments:
Post a Comment